How To Cook A Turkey
This post may contain affiliate links. We may earn a commission if you purchase via our links. See the disclosure page for more info.

Can you believe November is here already? It seems like I just finished making homemade donuts for Halloween. Today, I want to share how to cook a turkey because the holidays are right around the corner. I decided to update and repost this information because I want everyone to know the best way to cook a turkey for a Thanksgiving Feast or Christmas Dinner!
Here’s the deal: I realize some people go out to restaurants for holiday meals. It sounds terrific, right? No prep, no cleanup, no mess, but also no leftovers! Or as my reader Deborah states, and no “encore meals,” I love that term.
My goal is, and always has been, to teach others to cook from scratch. Today is no different. I have fond memories of my mom baking a turkey at this time every year when the family could get together. We had tablecloths, china, and her goblets, which she loved to use just for special meals.
We all pitched in, brought our specialty dishes, set the tables and chairs, and squished in together to enjoy a turkey feast. It’s all about memories in the kitchen and dining room together. Then we all cleaned up —so many dishes —but it didn’t matter because we worked as a team. We laughed and shared fun stories of years past and a few family secrets.
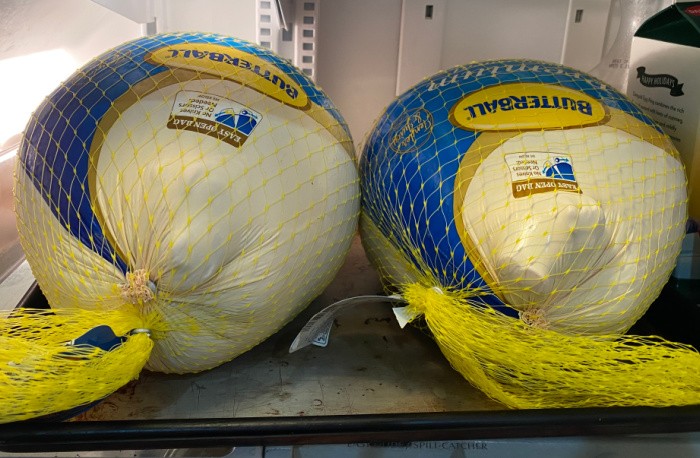
This year, it was truly sticker shock when purchasing turkeys for this post. Luckily, I have grandchildren nearby who will use the leftovers for meals over the next few days. I’ll show you the difference between cooking a turkey in a roaster pan in the oven and in an electric roaster.
Yes, I purchased two turkeys. Luckily, I have family to help with kitchen chores and eating, although not all of them live nearby. Contrary to some families’ Thanksgiving meal antics, we have a wonderful time together!
How to Prepare a Raw Turkey For Roasting
Step One – Thaw Your Turkey, if Needed
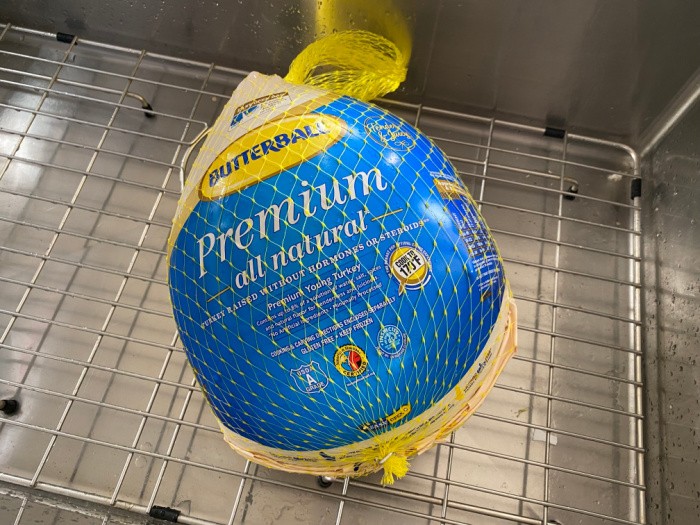
We placed the two turkeys on a cookie sheet in case any liquid from the turkeys in the refrigerator leaked as they thawed. It took almost 5 days to thaw them out, wow!
Step Two – Remove all Wrapping From the Raw Turkey
Here is one of the turkeys, thank goodness my daughter has a deep sink so we can cut the wrapping off of the raw turkeys.
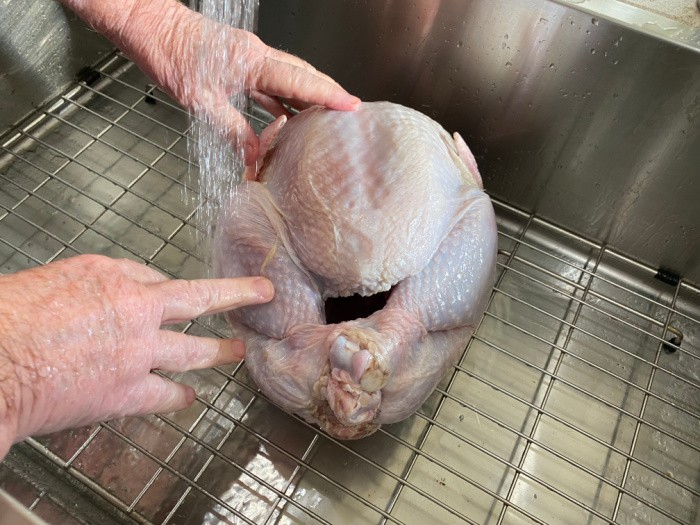
Step Three – Wash Raw Turkey – Clean Area After Washing
I always wash my raw chickens and turkeys, then pat them dry with paper towels. According to the USDA, we should not wash the turkey before we bake it. Here is the reasoning: I quote the USDA, “According to the USDA Food Safety and Inspection Service, washing raw poultry, beef, pork, lamb, or veal before cooking is not recommended. Bacteria in raw meat and poultry juices can be spread to other foods, utensils, and surfaces.”
Well, I am cautious about using bleach to wash down all the areas around the kitchen sink after I’ve washed the turkeys. I pay particular attention to the immediate area where I washed my turkey. But, this is totally up to you. It’s better to be safe than sorry, either way you choose.
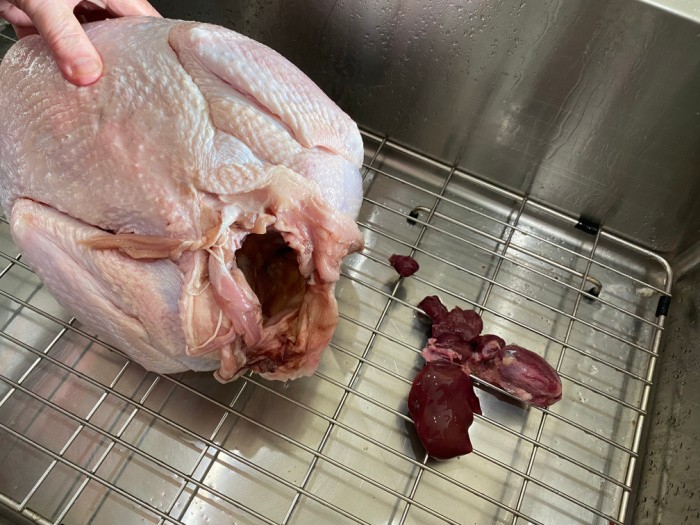
Step Four – Remove the Bag of Gizzards
The picture shows the turkey’s back, where you will find a bag full of gizzards (also known as giblets) and the heart. Remove the bag and decide if you want to cook the contents. My mother always saved the gizzard(s), and Mark always saved the heart to cook it and eat it later. This year, we discarded all of it. No one in my family will eat them, not even in dressing or stuffing.
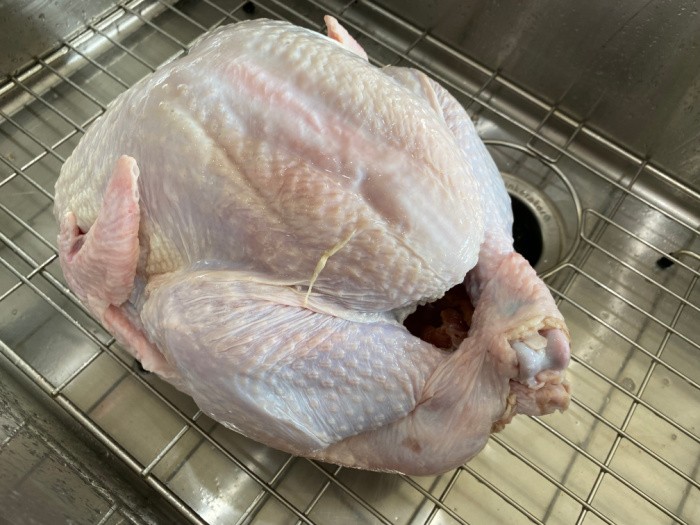
Step Five – Remove Neck and Discard.
This is the front of the turkey, where you’ll find the neck deep in the cavity. Remove the neck and discard it, unless you want to boil it for soup later. We never keep it because it has so little meat. It’s totally a personal preference. If you’ve ever watched the movie with Chevy Chase, “Christmas Vacation,” you’ll remember someone in the movie ate the neck. I can’t remember who it was. LOL!
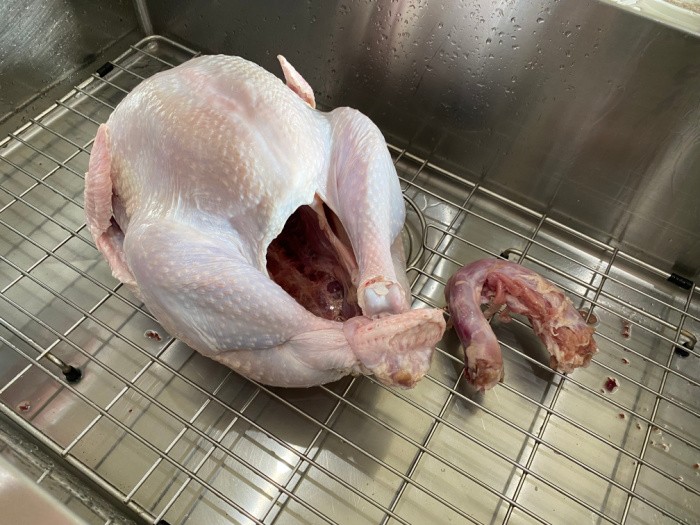
Step Six – The Neck Should Look Like the Picture Below
You can see the turkey’s neck in the picture below.
How to Cook a Turkey in a Roaster Pan
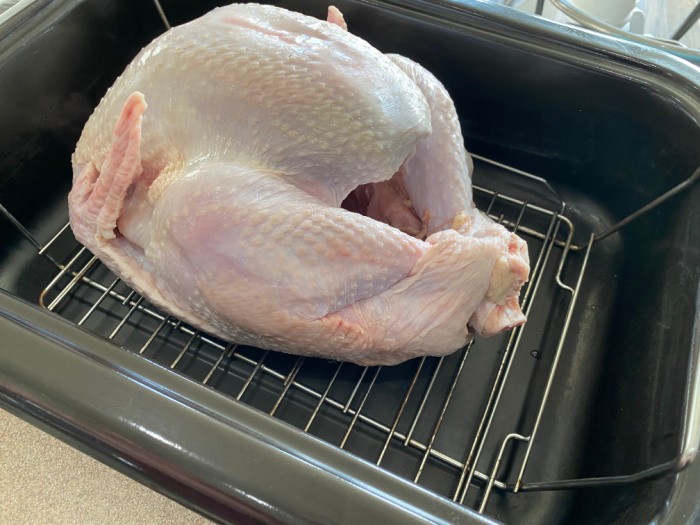
Step One – Place Turkey in Roaster Pan, Uncovered – Set Oven Temp to 325°F (165 °C).
This is the first turkey that’s ready to put in the oven. We’ll put it on the oven’s roasting rack after placing it in a roasting pan, uncovered, as shown. If the turkey starts to brown too quickly, I’ll place a foil tent over the whole turkey. We set the oven temperature at 325°F. 165°C.
Remove all racks from the oven except the bottom rack you will be using. Cook the turkey breast-side up in the roaster pan at the set temperature. See additional instructions below for cooking times based on weight.

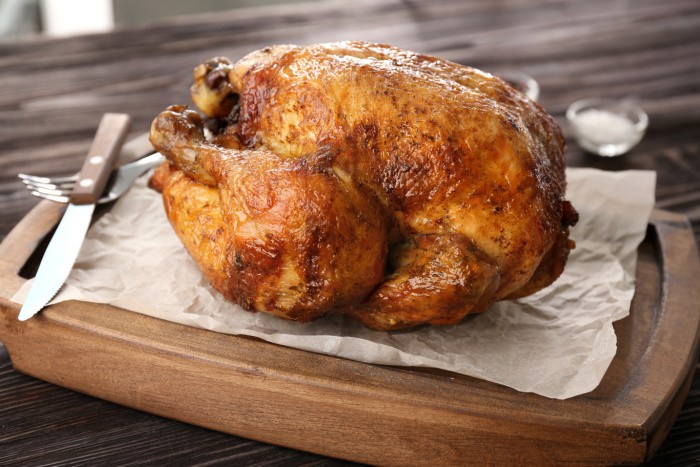
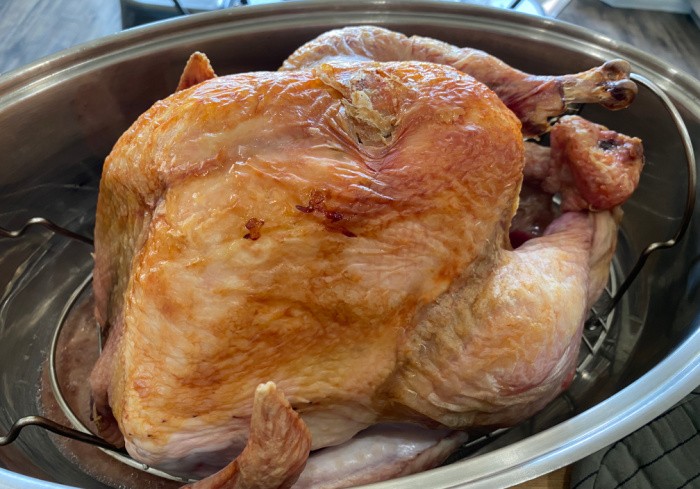
Final Product – Turkey Baked in a Roaster Pan Cooked in a Conventional Oven
This one was cooked in the conventional oven, and you can see it must have caught the top of the beautiful turkey as I pulled it out. It still tastes fabulous! Note the lovely brown color of the roasted turkey when cooked in the conventional oven.
Once the turkey has cooked, allow it to cool to room temperature, and then it will be ready for carving!
How to Cook a Turkey in an Electric Roaster
Step One – Place Turkey in Electric Roaster – Cover With Roaster Lid – Set Temperature to 325°F (165 °C).
This second turkey is going in the electric roaster, which will be covered with the roaster lid. We set the electric roaster temperature at 325°F. 165°C. Cook the turkey breast-side up in the electric roaster at the set temperature. See additional instructions below for cooking times based on weight.
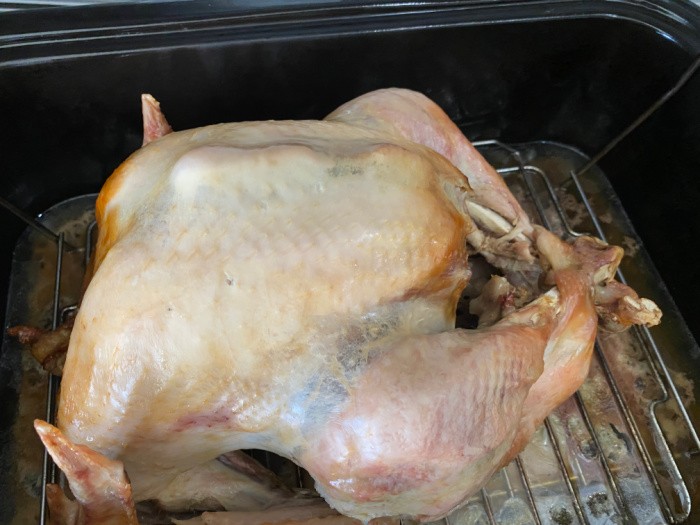
Final Product – Turkey Baked in an Electric Roaster Pan
This is the turkey we baked in the electric roaster pan. The flavor is excellent, but I love having a “browned” turkey. I could have put it in the conventional oven to brown it, but it’s fine as is. It sure cooked faster in my electric roaster. Some people allow the turkey to cool to room temperature before carving. Mark sometimes jumps the gun and starts carving ours right out of the oven or the roaster! As noted in the section below on turkey carving, a hot turkey may cause juices to escape during carving, so if you like moist meat, let the turkey cool a bit first.
How do I thaw a frozen turkey?
I know we don’t always agree with, or possibly trust, information from a government agency. Things have become so political these days. I will say that I have found almost everything relating to food preparation to be pretty reliable when issued by the USDA.
That being said, here is a quote from the USDA regarding the proper process when thawing a frozen turkey: “The USDA recommends thawing your turkey in the refrigerator.
This is the safest method because the turkey will thaw at a consistent, safe temperature. This method takes some time, so allow 1 day per 4-5 pounds. If your turkey weighs 16 pounds, it will take about 4 days to thaw. “How to Safely Thaw a Turkey.”
On its website, the USDA offers other options if you don’t want to thaw your turkey in the fridge for the suggested days. The first approach they mention is the cold-water method.
Cold Water Method
The instructions are to leave the turkey in its original wrapping, then submerge it in either your sink or a large container of cold water. They suggest using cold water, since you want the turkey to stay “cold” and not reach a temperature that is unsafe when using hot water.
You need to change the water every 30 minutes by emptying it and replacing it with fresh, cold water. They indicate that you should plan for about 30 minutes of defrosting time per pound, so a 10-pound turkey would take approximately 5 hours to thaw. You would then need to cook the turkey immediately.
The problem I see with this method is having to hang around all day (or night) changing out the water as indicated. Yes, it thaws faster, but it sure becomes a more “hands-on” method.
From the USDA
The USDA says to be sure and check your microwave oven owner’s manual on the proper process, but they suggest removing the wrapping and placing the turkey on a tray to catch the drippings as the bird cooks. They indicate it should take about 6 minutes per pound.
Note that most microwaves don’t have a revolving tray large enough to handle the average Thanksgiving turkey, so you’ll need to rotate the turkey several times during cooking and flip it at least once.
This process is designed to thaw the bird, not cook it, so be aware of any spots where the bird is actually being heated past the thawing phase and either cover that area or stop the process and start cooking the turkey in your oven at that point.
I did want to mention that the USDA did say you CAN cook a frozen turkey; you need to plan on cooking time being at least 50% longer than for a defrosted turkey. As for me, I use the refrigerator approach and have done so for years.
There are some old wives’ tales about how to thaw a turkey, and the USDA says to be sure NOT to use one of these methods:
- thawing the bird on your kitchen counter, in the garage, or on the back porch
- using a brown paper bag or plastic garbage bag
- using your dishwasher, either with or without the water
- any other method that isn’t listed above
Can I buy a fresh turkey?
Right now, turkeys are becoming a commodity in short supply. Depending on where you live, finding one could be a challenge. I haven’t noticed any particular benefit to a fresh turkey in terms of flavor, tenderness, moist texture, or other attributes you may consider necessary. If you thaw it out and cook it as recommended, you should be fine, and you’ll like the results.
How long do I cook a turkey?
Most cooks seem to have their favorite approach to Thanksgiving turkey preparation and cooking time. I’ve tried the “cook all night” method at a slightly lower temp, and the “morning of” method, where you cook at higher temps for a shorter time.
The key is to try to get the turkey fully cooked and ready to serve when it reaches and maintains a temperature of 165 degrees. The best way to test the temperature of the turkey is to insert a cooking thermometer into the thickest part of the thigh or breast of the bird. This will give you the most accurate reading.
I’ve listed below some cooking times based on weight and whether you are also cooking your stuffing “in the bird,” which the USDA frowns upon, by the way:
All cooking times are based on a minimum temperature of (325°F) = (162°C).
UNSTUFFED STUFFED
4 to 8 lbs = 1.5 to 3.25 hours 6 to 8 lbs. = 2.5 to 3.5 hours
8 to 12 lbs. = 2.75 to 3 hours 8 to 12 lbs. = 3 to 3.5 hours
12 to 14 lbs. = 3 to 3.75 hours 12 to 14 lbs. = 3.5 to 4 hours
14 to 18 lbs. = 3.75 to 4.25 hours 14 to 18 lbs. = 4 to 4.25 hours
18 to 20 lbs. = 4.25 to 4.5 hours 18 to 20 lbs. = 4.25 to 4.75 hours
20 to 24 lbs. = 4.5 to 5 hours 20 to 24 lbs. = 4.75 to 5.25 hours
Remember that not all ovens cook at the same temperature and that altitude MAY make a difference, too.
How do I brine a turkey?
I’ll admit I seldom brine my turkey before cooking it. I haven’t found that the flavor and moisture of the meat are enhanced enough to warrant the extra time. For those of you who want to give this extra step a try, here are some pointers:
There are two brining methods: wet and dry. Both use salt, sugar, and some aromatics, such as herbs (rosemary and/or thyme), citrus peel, and spices, but the wet method also uses water to immerse the turkey fully. In both cases, you let the bird “brine” for about 24 hours so the mixture has a chance to do its magic on the meat.
The challenge with the wet brine approach is having the space and container to cover the bird with liquid. Some cooks use a cooler. With the dry brine method, you rub the brine mixture all over the bird, wait 24 hours, then rinse it off and dry it.
I’ve talked with some cooks who swear by this meal-prep process to achieve the unique flavor and texture they want when they serve the turkey. Give it a try, who knows, you may be converted.
What temperature should I cook the turkey?
As shown above, the USDA suggests at least 325°F (162.8°C). It is generally recommended that you cook your turkey uncovered at this temperature. You can try higher temps, but you’ll need to monitor the turkey as it cooks so it doesn’t get overcooked. The key is the meat’s temperature, which they have always suggested be 165 °F (73°C).
When taking the turkey’s temperature to ensure it is entirely done, hold the thermometer perpendicular to the turkey and insert it into the area where the leg and breast meet. Push it deep into the center of the thickest part of the thigh. Be sure not to touch the bone since that could cause a misread of the temperature. 
Do I need a meat thermometer?
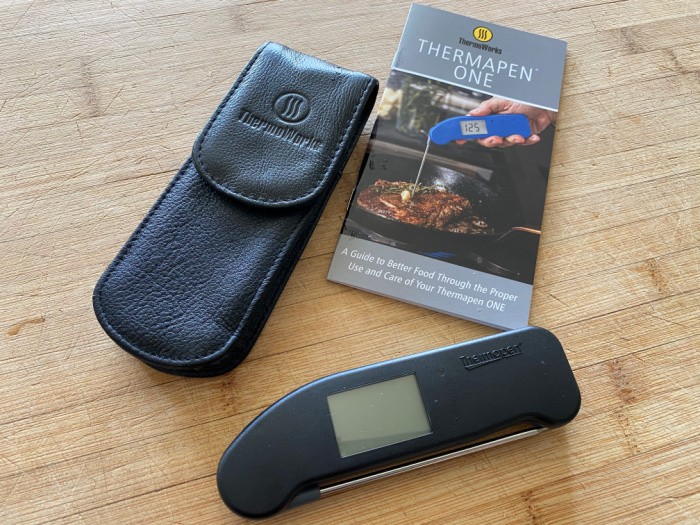
The most accurate and safe way to obtain the desired internal temperature reading is with a high-quality meat thermometer. If properly cared for, it should last for years. The safety of family and diner guests is undoubtedly worth the investment. I really like my digital instant-read thermometer, but there are other, less expensive types.
I’ve been asked about the accuracy of the “pop-up” style of thermometers/timers that are often found inserted in the turkey at the processing plant. I haven’t tested their accuracy, but I’ve heard they are usually set to pop up at 180-185°F, so if you use them, your turkey could very well be overdone and viewed by guests as a “crispy critter.”
Here’s the thermometer I have used for years, but any meat thermometer will work. Thermapen Website
What temperature should the turkey register when it’s done?
The USDA recommends at least 325°F (162°C) in the thickest part of the turkey.
How long will the cooked turkey stay safe in the refrigerator after cooking?
After you cook the turkey and refrigerate the sliced turkey meat, you have a short window before there is a safety risk. The turkey is only suitable for 3-4 days in the refrigerator.
Can dogs eat turkey?
I checked the American Kennel Club website to see what they had to say. Basically, dogs can eat almost any meat that is properly cooked for human consumption. Just make sure the meat you give them is free of any bone or gristle that might get caught in their throat.
The AKC indicated that most veterinarian visits this time of year are due to the “trimmings” given to dogs. That’s mainly due to the spices, butter, and other ingredients that are often applied to the skin or added to the stuffing. Be exceptionally careful of onions and garlic, which can upset their stomach
It is usually okay to serve turkey, potatoes, sweet potatoes, and veggies like peas. Steer clear of pumpkin pie since it has Xylitol, which is toxic to most animals. Master Class: Can Dogs Eat Pumpkin Pie
How do I make turkey gravy?
I’d like to suggest the following simple recipe for turkey gravy. Anyone should be able to put this one together:
Ingredients:
1/4 cup of the turkey drippings, which includes the fat and any juices generated during the cooking process
1/4 cup of all-purpose flour
2 cups of liquid, which can be from the cooked turkey, some turkey broth, and water
1/2 teaspoon of salt (you can adjust based on personal preference)
1/2 teaspoon of pepper
Cooking Steps:
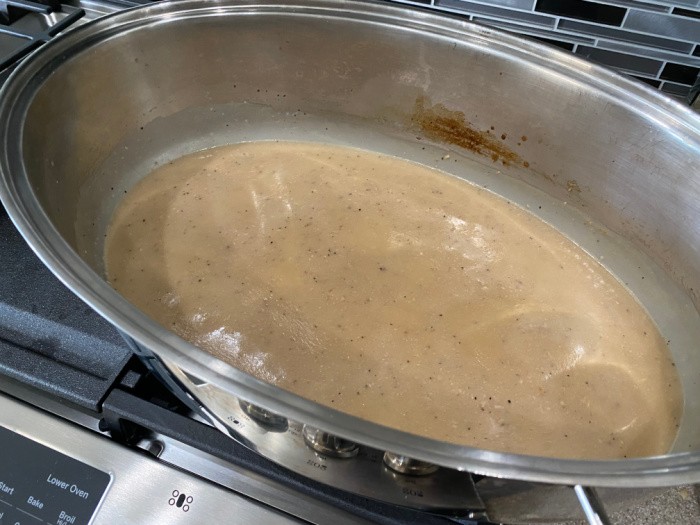
Take the drippings from your roasting pan and put them in a bowl, while leaving any brown particles in the pan. Take 1/4 cup of the drippings and put them back in the pan. Stir in your flour.
Cook this mixture over medium heat, stirring continually until the mixture is smooth and has bubbles. Stir in the liquid ingredients while heating to a boil, again stirring continually. You’ll stir this boiling mixture for at least a minute. Add and stir in the salt and pepper. Serve while hot.
How do you season a turkey?
Some turkeys can come seasoned, but a safe bet is to brine the turkey as discussed above. I just put mine in the pans without seasoning right from the package. Please tell me what you do with your raw turkey. I like simple solutions, so sometimes I use All-Seasoning Salt.
One traditional way to treat a turkey is by basting it. You bast the turkey by taking the liquid you see at the bottom of your pan and spreading it out over the top of the turkey, paying particular attention to the breasts of the bird. You can do it as often as you’d like, but every half hour to an hour will probably be sufficient.
Basting helps keep the meat moist since it tends to slow down the cooking process. It also causes the liquid from the pan to caramelize on top of the turkey during the cooking process. You can use a basting brush, a large spoon, or a ladle.
Is it safe to stuff a turkey with stuffing/dressing?
The USDA suggests you cook your stuffing in a separate pan. The stuffing CAN affect the temperature and cooking time as illustrated above. Better to be safe than sorry. If you want to cook the turkey and stuffing/dressing together, be sure to follow the times shown based on the weight of the turkey being cooked.
How many pounds of turkey per person should I plan on buying?
Generally speaking, you should plan on 1-1/2 pounds of turkey per person. So add up the turkey-eating guests and plan on this amount per person. It’s almost easier to plan on 1 pound per person (there’s a lot of bone in turkeys).
So if you have 20 quests, plan a 20-25 pound turkey. Of course, we want leftovers for sandwiches, right? Maybe a 25 to 30-pound turkey would be perfect. You can always freeze the leftover turkey meat. Since children tend to eat less, you may need to make some adjustments if there are many younger guests.
Can I freeze the leftover turkey?
You can keep the cooked turkey in your fridge for a few days, but the safest bet is to freeze any leftovers. Mark and I love to make turkey sandwiches for days after the holidays. When he trims the turkey he tries to separate the dark meat from the white meat since he prefers dark and I love white meat.
When it comes to the cleanup phase, we put the meats in smaller freezer bags and then pull them out and thaw them in the microwave so the meat is ready for a sandwich or larger meal with the leftover gravy, cranberry sauce, and other goodies. Gotta love holiday meals and all the leftovers. If properly wrapped, the cooked turkey will be good in the freezer for 3 to 4 months.
How do you carve a turkey?
Allow your turkey to cool
The most important thing to do before carving a turkey is to allow it to cool at room temperature for about 15-30 minutes. This is called letting the turkey “rest.” This allows the juices to settle a bit, giving the meat a chance to absorb the juices so that the moisture is retained in the bird rather than being released onto the plate during carving. Allowing the turkey to cool down before carving will also make it easier to handle while carving.
Items you will need for carving
You will need a good quality sharp knife. It doesn’t need to be a special carving or boning knife, but it does need to be sharp. You’ll want a roomy cutting board so you can shift or move the bird around some as you cut it. Depending on how you separate your cut pieces, you’ll need one large plate or separate plates for the different cuts of meat.
Cut the twine on the turkey
Place the cooked turkey on the cutting board with the cavity facing towards you. You will need to cut any butcher’s twine that is holding the legs together. That gives you access to all the turkey parts you want to cut away.
Cut off the thigh and leg of the turkey
There is skin near the top of the thigh that needs to be cut so you can cut the leg from the body of the bird. Once the skin is cut you can see the joint that needs to be cut so you can pull the leg from the body. It may take a little tugging to break the joint and pull it while cutting along the body. You’ll repeat this step with the other leg.
Then slice the wings from the bird
You can cut off the wings by pulling them back from the body until you hear a popping sound. Slice through the skin and joints much as you did with the legs.
Now remove the breasts
On the top of the turkey, you’ll see the breastbone. Take your knife and cut along the side of the breastbone. The bone will curve toward the back of the turkey as you cut, making some long strokes to separate the thick white meat from the breastbone. You’ll do the same thing on the other side of the turkey.
Cut up the white breast meat
The breasts provide the most meat from the turkey. Although the darker meat can at times be moister, it seems most people prefer the taste and texture of white meat. You’ll want to cut the breast meat into slices that people will want to put on their plates from your serving platter. This also provides slices that can be placed in freezer bags for future use.
Now slice the dark meat
You’ll want to separate the thigh from the drumstick. This is another task that requires you to cut through the joint. You can cut the meat from the drumstick, but sometimes you’ll have a guest who likes to eat the dark meat right from the drumstick itself, much like you would picture the Vikings did in the olden times. Now the thigh is there for you to slice once you’ve removed the thigh bone.
What can I serve with roasted turkey?
- Mashed Potatoes
- Gravy
- Caramelized Carrots
- Coleslaw
- Baked Sweet Potatoes
- Mac and Cheese
- Fresh Cranberry Salad
- Homemade Rolls
- Stuffing
Looking for a turkey recipe to use to make with your leftover turkey? Check these out!
- Our Favorite Thanksgiving Leftover Turkey Ideas
- Easy-To-Make Turkey Soup
- 20 Ways To Enjoy Turkey Leftovers
- Easy Turkey Pot Pie
- How To Make Turkey Cranberry Roll-Ups
My Thanksgiving Tip
I have done this for years, laminate your recipes and grab some cookie sheets. Place all of the measured ingredients on each cookie sheet so those who are helping with the meal can make the recipe with ease.
Final Word
We all enjoy the holidays, this special time of year. It means getting family and friends together for great food and conversation. Although it can be a lot of work preparing meals for each holiday, it is surely worth it to create lifetime memories and good food to match.
I hope this post about how to cook a turkey proves helpful as you begin your holiday meal plans for Christmas, Thanksgiving, and possibly New Year’s, too. Refer to it often, print out the recipe information for a quick reference, and relish the delicious meals for weeks to come. May God bless this world. Linda
Copyright Images: Whole Roasted Turkey AdobeStock_288597690 by Fahrwasser, Roasted Turkey AdobeStock_173682238 by Africa Studio


Well, I suppose this post is appropriate following that the country just cooked its own goose!! Sorry, I couldn’t help myself.
Hi Harry, oh my gosh, now I have the giggles! Linda
Harry,
Great comment and sadly, too true.
Great info Linda! Years ago my little sister (10 years younger than me) decided to host Thanksgiving at her new home. She had never cooked a turkey before but hey, how hard could it be? She decided to make stuffing in a casserole dish. Came time to carve the bird – She didn’t know there was a neck and a bag of giblets inside!! She was mortified- the rest of us about died laughing. Not sure she’s ever going to live that one down!!
Hi Beth, oh I LOVE this!! It’s all about making memories! I bet she will never live that one down! Great story, thanks for sharing! Linda
I have made it my life’s work to teach everyone I know, just how easy it is to roast a turkey. From my daughter in law to the PA in my chiropractors office. I can’t tell you how many people are amazed that there is no mystery. Today is Veterans Day, a special thank you to Matt and others who have served to keep us safe. God Bless
Hi Chris, great comment! It’s great you are sharing how easy it is to cook a turkey!! It’s a great day to thank all of our Veterans!! Linda
How does Pumpkin Pie have xylitol in it? Many dog and cat foods contain pumpkin purée especially those for sensitive digestion. They tell you to feed pumpkin purée ( plain, no additives) if dogs are having diarrhea or other stomach issues. As for me I don’t use pumpkin pie filling, alcohol sugars, alternative sugars, or alcohol in my pumpkin pie. Just honey or Maple syrup for sweetening. And I never put chocolate in my pumpkin pies either.They should only have a small amount of pie rarely because of the fat and sugar content. Just curious.
Hi MaryAnn, I have never used xylitol in pumpkin pie. Is it in the ingredients on the pumpkin puree can? Linda
Hi MaryAnn, oh my gosh, I just added this to my post. I forgot this when you asked. Thank you for asking, it’s sugar-free pumpkin pies. https://www.masterclass.com/articles/can-dogs-eat-pumpkin-pie Thank you, Linda
Had to laugh about the “innerds” bag in the turkey. My mom almost did the same thing as the turkey she got didn’t have the bag in the cavity but at the other end of the bird. If you or anyone has pets this is what my mother did. She loved eating the neck so mom would take the neck and the “innerds” , boil them up and then feed the chopped up heart, gizzard and kidneys to our cat. Big George would get so excited to see the turkey coming it as he knew he’d be getting a treat.In fact after mom passed a local group who only knew a man and his 6 kids lost their wife/mother 3 weeks before Christmas , dropped an turkey and toys for our family. I found it on our front porch with Big George spread eagle on the turkey, claiming it for his own. My mother passed when I was a senior in high school we were much older than the group knew( other than my baby brother who was 2 at the time). Dad contacted the group and got a
DH and I cook our stuffed turkey in one of those cooking bags the night before along with boiling our unpeeled spuds. When turkey was done , DH will carve up the bird and I would capture the “juices” and unstuff the bird. I then will cook the stuffing in a casserole that night to make sure its thoroughly cooked, pack up the carcass and into the freezer to make broth another time.Next day we will heat up the turkey and peel the spuds and heat them up so we can mash them up. I make the gravy and the other family members attending will bring a dish to pass. I’ve done this for over 40 years now and no one has EVER gotten sick form my turkey or stuffing. I do have a funny story, my mother passed when I was a senior in High School Eldest of 6, youngest was 2. A local group learned that a father of 6 lost his wife /mother 3 weeks before Christmas. SO we received a basket of toys and a huge turkey and fixings. I found it on the porch after I picked up the siblings from their respective high school with Big George sprawled on top of the turkey claiming it as his own. We tried to remove him but oh my gosh, he growled at us and wouldn’t let go. Took me and my brother to detach him from the turkey. Needless to say BG was thoroughly miffed at us, took him a day to accept our “apologies “.
Dad contacted the group and got a name from them of another family that could use the toys and food. We of course replaced said turkey (and we added some more stuff for the family). Dad, me and my brother delivered it to the lady that night.
Hi Kathy, thank you for sharing this wonderful story. I will think of Big George from now on when I take the innerds out! LOL! I Love this! My mother always stuffed the inside of the turkey, that was normal back in the day. None of us got sick either, but now every thing I read says not to do it. Old habits are hard to change. We can cook our turkey any way we want! Tomorrow is Halloween, this year has gone by so fast, then on to Thanksgiving. Thank you sharing this great story about Big George. Linda
Yes he was a great cat. Mom named him BIG George as he was the runt of the litter. But he turned out to grow into his name. He was about 17-18 pounds when he passed.He always gave my mother a “present” on her birthday, not sure how he figured that day out but she would always get something from him. She was careful to praise him and dad would “take care ” of it. Never did that with anyone else, just her.
Hi Linda:
My husband washes the the turkey and puts it in our roaster. I make my own spice mix and we use that on the bird. I do not put my dressing in the Turkey but make it in the oven. That is because I don’t like having to dig out the dressing from the Bird. It cooks better separately and is more evenly cooked separately. There is so much left after Thanksgiving and Christmas so I use my seal a meal and put the extra in the freezer. Then we don’t have to worry about New Years day. Then we don’t have to worry about what to make for New Years day. I also make a great Turkey salad for lunches for my daughter for the first week after the holiday’s. It is filling and a wonderful dish for Chicken or Turkey. Havent tried it with pork and not sure it would taste too good. If you want the recipe for the Turkey/Chicken salad let me know.
Hi Jackie, oh that’s a great idea, I love having a FoodSaver to save the extras! Great tip for New Year’s Day. I would love your chicken/turkey salad recipe, thanks for sharing. Thank you so much, Linda