
Pressure Canning 101: The Most Comprehensive Guide
This post may contain affiliate links. We may earn a commission if you purchase via our links. See the disclosure page for more info.

Some people might be intimidated by the idea of pressure canning. It seems complicated and risky. But it’s not! It’s a straightforward process that is relatively safe if you follow the proper methods. If you’ve been curious about pressure canning or tried it before and had a bad experience, this Pressure Canning 101 comprehensive guide is for you.
I always follow the guidelines from the National Center for Home Food Preservation. They’ve extensively tested to determine when acidic foods must be processed to make them safe for storage. Mark and I took the classes to receive our Master Canner Preserver Certificates.
If you have a state extension service office in your city or county, the cost of training is minimal. As I remember, the classes took 12 weeks. It was so much fun. We met other canners, from beginners to experts, who needed to learn the updated techniques. Our food products have changed since Grandma was canning, so most of us need to improve our skills.
Pressure Canning 101: The Most Comprehensive Guide
What is Pressure Canning?
Pressure canning is a method of food preservation that utilizes pressure to seal food in cans or jars. The pressure forces the air out of the container, which prevents bacteria from entering and spoiling the food.
Why Use Pressure Canning?
Pressure canning is the only safe way to preserve low-acid foods like vegetables, meats, and fish. Low-acid foods can cause botulism, a severe and potentially deadly foodborne illness. Pressure canning destroys the bacteria that cause botulism, so it’s the only safe way to preserve these foods.
Botulinum spores are tough to kill at boiling water temperatures. However, the higher canner temperatures can destroy them much more quickly.
When heated, acidic foods contain enough acid to prevent the growth of bacteria that cause botulism. However, low-acidic foods are not acidic enough to prevent the growth of these bacteria, so they need to be pressure-canned.
All low-acidic foods, such as vegetables, meats, and fish, should be sterilized at temperatures of 240℉ to 250℉, attainable with pressure canners operated at 10 to 15 PSIG.
At temperatures of 240℉ to 250℉, the time needed to destroy bacteria ranges from 20 minutes to 100 minutes, depending on the kind of food being canned.
Pressure Canning 101
Before you start pressure canning, ensure you have everything you need. Here’s what you’ll need:
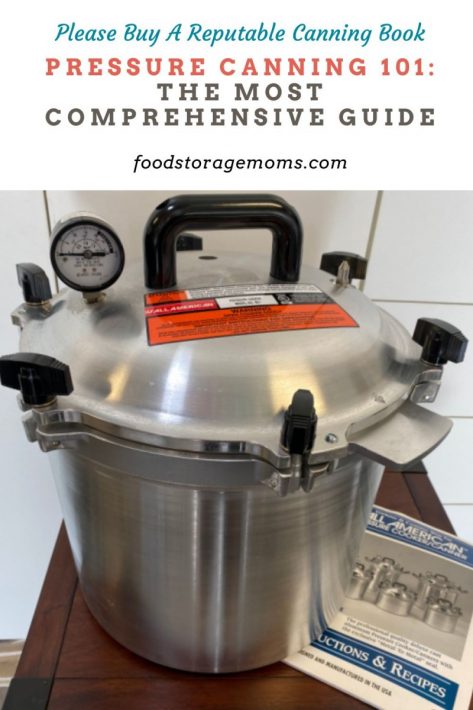
- Presto Pressure Canner or an All-American Pressure Canner
- Prepworks by Progressive 3-Piece Canning Essentials Kit
- Canning Jars (with lids and bands)
- Ladle
- Towels and pot holders
- Pots and bowls
- Spoons & Knives
- Food to can
- Other ingredients, depending on the recipe
- Ball Canning Guide
- USDA Canning Guide
Always use high-quality food for the best results. Follow the step-by-step directions below to pressure can your food like a pro!
Put Hot Water in the Pressure Canner
First, put 2 to 3 inches of water in the canner (some foods require more water; always follow the recipe directions).
Clean the Jars
Next, you’ll want to wash your jars to ensure they are clean. Once you’ve washed your jars, you’ll want to keep them warm until you’re ready to use them. There are three options for doing this:
- Please place them in a water canner. You can place the jars upside down in a water canner.
- Please leave them in the dishwasher. If you wash your jars in the dishwasher, you can leave them until you are ready to fill them. Keep the door closed, so keep the heat in.
- Use another pot. You can also place the jars upside down in another pot of water. Boil 2-3 inches of water, then turn the pot off.
Fill the Jars with Food
Depending on your recipe and what you are preserving, there are two methods to preserve food: pressure canning.
- Hot packing means your food is hot before you put it into the jar. Typically, you will simmer the food for a few minutes first. This method is an effective way to remove excess air and is particularly suitable for meats and fruits.
- Raw packing means the food is not cooked before it is put in the jar. This method is more suitable for vegetables.
Whichever method you use, prepare and pack the food according to your Ball or USDA canning guide. Then, fill the jar, leaving the recommended headspace.
Remove the Air Bubbles
After the food is in the jar, remove any air bubbles. You can do this by running a non-metallic spatula around the inside of the jar. A small rubber spatula works well.
Clean the Rim
The rim needs to be cleaned for the lid to seal. Wipe the rim of the jar with a clean, damp tea towel or paper towel.
Add the Seals and Rings
Next, place the seals and rings on the jars. You don’t have to tighten the lids like a machine; finger-tight is fine.
Place Jars in the Pressure Canner
Set the jars upright on the rack in the pressure canner using a jar lifter. The rack keeps the jars off the bottom of the pot, preventing them from hitting each other while boiling.
Put The Lid On & Heat
Securely fasten the canner lid. Then, with the weight off the vent port. Heat the pressure canner at the highest setting until steam flows freely from the vent port. Let the steam flow continuously for 10 minutes.
Close the Vent
Next, place the weight on the vent to close it. The pressure canner will begin to pressurize, taking about 3 to 5 minutes.
Start the Timing Process
Start the recipe’s timer once the pressure reading dial reaches the recommended pressure (240℉ to 250℉).
Regulate the Heat
Keep an eye on the pressure canner, ensuring it maintains a steady pressure at or slightly above the correct gauge pressure. You must follow the canner manufacturer’s directions for how a weighted gauge should indicate that it maintains the desired pressure.
Important: If the pressure exceeds the recommended amount, return the canner to pressure and begin the timing again!
Turn off the Heat
When the timed process is complete, turn off the heat and let the canner depressurize. DO NOT force-cool the canner. Forced cooling can result in unsafe food. Depressurizing the canner will take about 30-45 minutes.
Remove the Weight
Once the canner has depressurized, remove the weight from the vent port. Wait about 10 minutes before unfastening the lid and removing it. Be sure to remove the lid away from you so the steam doesn’t burn your face.
Remove the Jars
Using your jar lifter, remove the jars from the canner and place them on a towel to cool. Leave a 1-inch space between each jar while they cool. The jars should sit at room temperature, undisturbed, for 24 hours.
Test the Jar Seals
After cooling the jars for 12-24 hours, test the seals. Remove the screw bands and test using one of these three methods:
- Press the middle of the lid: Use your finger or thumb to push the middle. If the lid springs up when you release your finger, the lid is NOT sealed.
- Tap the lid: Using the bottom of a teaspoon, tap the lid. If it makes a dull sound, the lid is not sealed. But if it is sealed correctly, it will make a ringing, high-pitched sound.
- Look across the lid: Hold the jar at eye level and look across the lid. The lid needs to be concave or curved down slightly in the middle.
Some Things to Keep in Mind:
Altitude Does Make a Difference
Most people who cook a lot realize that the altitude of the location where they do that cooking can affect cooking times. Recipes often call for the food product to be boiled. The time it takes for the water to boil varies considerably based on your altitude; the higher the altitude, the longer it takes to reach a boiling point.
The same logic applies to the canning process. The time it takes to bring the water in the canner to a boil must be considered when calculating processing times.
There isn’t room in this post to illustrate all the variations of altitudes and time to boil, but your Extension Service agent should be able to provide some tables or charts to help you out. Your canning books will have charts as well.
Acidity Levels Have to be Considered
As mentioned above, foods have a wide range of acid content. Many fruits naturally grow with a high level of acid in their makeup. As such, they can be canned in a hot water bath canner since the acids kill the botulism bacterium when brought to a boil. Remember that the processing time in a water bath canner will be longer, as the temperature must be maintained for an extended period to achieve the desired results.
Low-acid foods require higher temperatures (240°F—250°F) for the bacterium to be killed, and that’s why a pressure canner is needed. It is the only way to reach and maintain the necessary temperatures for an extended period. Yes, a pressure canner is required to can most vegetables and meats, as they have a low acidity level. Due to the pressure achieved in these special canners, the temperatures are higher, so the processing time to kill the bacteria is shorter.
PH is the Rating Factor for Acidity
Many of us are used to testing the “PH Factor” of the water in our swimming pools as part of regular maintenance. We are testing to determine the level of acidity or alkalinity in the water. Once that’s determined, we have our marching orders of what chemicals must be added to make the water match our comfort levels.
The same issues apply to foods to be canned. If a food’s pH level is 4.6 or lower, it is considered a high-acid food. If it is above 4.6, it is considered low-acid and requires acid added, such as lemon juice, citric acid, or vinegar, to make it safe for processing. Again, low-acid foods should be pressure canned.
Pressure Canners Aren’t Created Equal
My posts explain my philosophy of always buying right the first time. Getting good-quality products that will perform as advertised and last a long time makes sense to me. Today, we are talking about Pressure Canners.
Yes, they may cost more, but in the long run, I think it’s worth the time and effort to budget so I can get the right one the first time. I bought and used the All-American model 921 heavy-cast aluminum pressure canner. I’ve had other models in the past, and they worked great and processed the food just the way I expected.
The Gauge Accuracy is Critical
The pressure gauge must accurately reflect the internal pressure for the pressure canner process to work as designed. Most gauges will show the PSIG (pressure per square inch gauge) up to 20 psi. Again, altitude affects the pressure needed to process the food since it reflects the internal temperature. The higher the pressure, the higher the temperature.
Gauges can get out of adjustment over time. It is suggested you have them tested at least once a year.
Final Word
I hope this guide has been helpful and that you feel confident about canning your food! Check out my Home Canning- Important Dos and Don’ts post to learn more. Always follow the guidelines directed by the National Center for Home Food Preservation. They have done extensive testing to determine the proper times for canning foods. If you have any questions, please leave a comment below. Happy canning! May God bless this world, Linda


It’s definitely worth doing. My wife did when we first married but stopped for several decades then we’ve both picked it back up.
Between water bathing and canning we did around 300 jars of stuff this last year. I gave away many jellies and a few other things to those who are neighbors and watch my place and care for my chickens when I’m on trips etc.
A friend of ours showed us several tips and the pass down information I’d extremely important. We are using things that are a hundred years old passed from generation to generation. To me that’s important, cool and much desired no matter if it’s mechanizing, farming, canning, gardening or what. The old ways have merit and value and can work in conjunction with new school stuff.
It can be daunting at first but then the “ping” will get into your blood and you’ll enjoy the work.
Hi Matt, oh the “ping”, it does get into your blood! Life is so good looking at those jars lined up! Nothing better! Linda
When I first bought my Presto pressure canner, I had the dial gauge tested yearly. When the COVID quarantine hit, our local extension was closed and I couldn’t get my gauge tested. So, I bought the weighted gauge that Presto sells. Now I don’t have to worry about having an accurate dial gauge, I just rely on the weighted gauge.
Hi Becky, oh my gosh, I had not heard that Presto has a weighted gauge! Love it! Linda
I was almost 40 when I first started canning. My dear MIL taught me to can green beans. LOL From there, I’ve canned so many things. We have weighted and dial canners. Last time we canned, my husband did most of it. I helped prepare the foods and fill the jars. I do love canning and eating the harvested, canned food. I grew up shelling peas, and snapping beans. It was always such a good family time. I also grew up freezing foods. I grew up in a 3 generation household. There’s nothing like it. It’s the best way to grow up.
Hi Deborah, what a blessing you had three generations living in your household! There is something about canning with your family together! I LOVE it! Linda
We didn’t can at that time. I was newborn until I was 5 1/2 years old. Then mother remarried, and we moved. There was 3 adults, a teen ager and 3 children. I did go and spend as much of the summer with my grandparents as I could. Even after I married and had children.
Hi Deborah, oh I forgot you mentioned your mom remarried when you were very young. Grandparents can be a blessing for sure. Linda
Yes they can. And mine were the best for me. They were as much my parents as Mother was. I don’t remember a lot of my childhood there before Mother remarried, but I remember being so very happy.
Hi Deborah, oh I love hearing you had great childhood memories! Life is so good! Linda
I water bath canned for years but last year made took the plunge and bought a pressure canner. Wow what a time and money saver! I could use them for a quick meal on a busy day. The real savings came when I took our pressure canned meals on trips or camping. It was amazing to have a shelf stable meal that could be heated on a stove or in an instant pot after a long day outdoors of hiking or skiing. We recently took a trip to Yellowstone and Glacier NPs and were gone for about 10 days. I brought enough pressure canned and other canned goods such as apple butter and apricot sauce to make all of our dinners except for one special meal where we ate out. I would add in rice, pasta, and bring chips as the added carbs to each meal. I would cook the rice and pasta as needed in the instant pot with the pressure canned meals since rice and pasta shouldn’t be pressure canned. This alone probably saved us a couple hundred dollars and we felt better eating healthy meals.
Hi Amy, oh I LOVE LOVE LOVE your comment. You know it’s so much “easier” to just stop and buy meals but the cost is prohibitive. Kudos to you for planning ahead and taking your meals. We do the same thing with our family. Great comment! Linda
I love pressure canning. It gives a very good seal on things. Just make sure to follow the USDA complete guide to canning to the letter. This is not the time to be creative. I use a bit of vinegar on a paper towel, on the jar rims to be sure they are clean.
Hi Janet, I also follow the USDA complete guide to canning to the letter as well. I got the one with the spiral binder. I know people can download the pages but it would take a lot of paper and ink. I like the idea of some vinegar on the paper towel, love it! Linda
There’s not other way to can. If you do t use the USDA guide, you’re taking a chance on killing yourself and your loved ones. Just my humble opinion.
Hi Deborah, you are exactly right. One thing I learned when I took the Master Canning Preserving class was OUR FOOD has changed. The acidity has changed and therefore we have to add lemon juice or vinegar 5% to bring the food up to safety. I tried to explain that to a class I taught. Remember when we would get canker sores if you ate too many tomatoes in one sitting? They used to be more acidic. I learned a lot in that state extension class even though I had been canning for over 50 years. Linda
I was terrified of pressure canners – scary experiences with my Nana when I was very young :)! My husband actually canned a lot (lived in Alaska) – he taught me and I researched like crazy! We probably have over 1500 cans of food in our pantry now.
Love that ping!! LOL
Hi Beth, oh, what a blessing to have that many jars of food! Life is good when we hear that ping! Linda
I had both good and bad memories. I prefer to remember the good and try to forget the bad. Some were really good and some really bad. I dwell on the good.
Hi Deborah, I get it, we all have good and bad memories. We have to dwell on the good, I totally agree. Linda
I use the canning book you recommended to me to me. If this program something different or part to the program you talked about.
Hi Jackie, this is all from the book I recommended it. I do everything exactly as stated. My main goal was to have an article to show people how easy it is to pressure can. I always have a USDA canning guide by my side when canning. It’s all about how easy it is to pressure can and safety. We can all pressure can. Linda
You had an Insta Pot pressure canner you said? So the same company that makes those slow cookers and pressure cookers also makes a canner?
I know, and you know as well that they claim some of their cookers can be used for canning, but nobody trusts them, so I’m not even brining that up.
If I understand correctly, if you have the weighted gauge then you don’t have to worry about having it checked?
Also I heard jars and lids were available, but still scarce as compared to before all this mess came upon us. I have though about buying the reusable lids if we can swing purchasing a pressure canner or even an open water bath pot, but as I have learned, even those reusable lids may need replacement after a lot of use or any damage. Lack of jars and lids is what keeps me from really moving to getting a canner.
Hi Frank, I removed the paragraph on the InstaPot Pressure Canner, I DO NOT HAVE ONE. I meant my InstPot Pressure COOKER, I gave them away. The instructions were so mixed up. I know everyone loves the Instapot Pressure COOKERS, but I do not. Now, back to the combination “Pressure Cooker and Canner, the USDA states they are not reliable and strongly suggest NOT using them. Thank you so much for catching that typo. I really appreciate it. Linda
Linda,
Here’s a tip for those who don’t want to heat up their house while pressure canning (as it seems most canning gets done in the summer or early fall when the heat here in AZ is extreme). I do it outside using a propane Bayou Classic High Pressure Cooker set inside a windscreen. The windscreen is necessary here in Kingman where it seems to blow hard all the time.
https://www.amazon.com/dp/B000291GBQ/ref=as_sl_pc_as_ss_li_til?tag=rdw0a-20&linkCode=w00&linkId=0e2610e945c9e931cfa44808af72e73b&creativeASIN=B000291GBQ
It works great and doing it outside means I don’t have to run my A/C to cool the house as much.
Hi Ray, oh my gosh, I love this, great tip! Thanks for sharing, I have a camp chef with a windscreen as well. Good one! Linda
Sometimes, Linda, I just cannot read your posts!!! They take me down so many rabbit trails. For example, I started reading your post this morning and an hour later, came back to the post BECAUSE, I started looking at the WY Extension website(s)!
I grew up canning – both water bath and pressure. I can’t recall what brand pressure canner my mother had but it was BIG. Dad had to put it on the stove and we had a step stool for mom to put the jars in and out! Hey, she was short!! We were never afraid of pressure canners (or cookers either) because we used them a lot!
I recall the time my son-in-law contacted me and asked me about pressure canners. I didn’t have THAT much experience with the brands as I had a Presto canner when I was raising my daughter. That said, he told me about an All American canner (used) that he could get for $175. I told him to get it asap!! Told him it was a great price for that brand. But I did explain the need to have things tested. Don’t actually know if they did!
I did run across an interesting website that shows comparisons on several different pressure canners – The 7 Best Pressure Canners of 2024, Tested and Reviewed at thespruceeats.com.
Well, now that I have gone down the rabbit holes and checked out my local on-line presence of WY extension information, I need to get my day started!! Thanks for a great post!
Hi Leanne, oh my gosh, if they got an All American for $175 that’s a bargain! They just need the gauge checked once or twice a year depending on how much they use it. No gaskets in an All American. I used a Presto for 25 years then I bought an All American. I love this! Linda
Question:
When I sold my regular mouth jars to replace with wide mouth jars, I must have had a brain burp that day.
I bought too many pints and not enough quarts.
I of course never keep receipts.
How can I maximize my yield with pints in a water bath canner, plus save time.
Can I place a towel on the bottom and place jars on that and have the rack still on top hanging from the side??
I just bought two boxes of tomatoes.
Oh, they are too tall for stacking.
8 will have to do unless I want to go to walmart….not today.
I still have two cases of quarts.
Hi JayJay, yeah you can’t stack quarts, they are too tall. Linda
Hi JayJay, I do pints with a rack on the bottom and a rack on top of the first layer of the pints, two racks for pints if I do pints in a Pressure cooker or water bath. I use a rack on the bottom for quarts in my pressure cooker or water bath unit. No towels, ever. I hope this helps. Linda
Funny, the timing of this article, Linda. I just finished, 2 weeks ago, a HOW TO Manual for my sister and children in case I have died when a long-term disaster occurs. I did a 9 pager on pressure canning, with lots of photos and explanatory text boxes on the parts of the canner. Other parts of the manual include how to grow tomatoes and how to save seed, how to grow different beans and peas and save seeds, how to grow sweet potato slips and sweet potatoes, how to grow white potatoes and how to get them to chit, how to grow and preserve mustard and collard greens, how to hill-up squash and how to hand pollinate the flowers of them, pumpkins, and melons, when, here in north Florida, they need to start seeds indoors to be ready to plant by March 15 (potatoes on Valentines Day), which plants need to be pinched, which plants need support, pictures of many ways to provide support for climbing plants, and how to dehydrate fruits and vegetables in a net, hanging bag. I also made a Plant Compatibility Chart so they would know which plants do and don’t like each other. It took me weeks, finding all the photos I needed. Fortunately I had taken photos myself of a lot of my plants in different stages and with different pests. I have provided my family members canning jars, lids, canning utensils, and seeds of everything we grow here. Now, if I die, they can survive, if they follow instructions. I hate that I can’t just download the knowledge in my head to a thumb drive!
Pressure canning is such a valuable skill it should be taught to all our children. And that ping is addictive. BTW I raw packed the chicken I canned 6 years ago and it has stayed good, but you are right that hot packing is preferred for meats.
Hi Ray, you are so right pressure canning is such a great skill! I can’t remember if we cold packed or hot packed the chicken in my Master Canning class, That was the first time I had ever pressure canned meat. I know they cooked the hamburger patties before canning, they were nasty. We also did plain cooked ground beef, nasty. LOL! Chicken was good! In fact, I brought my All American pressure canner for the instructor to use. They had a Presto pressure canner which is what I used for years. She adjusted my gauge for me after the class. They do it for free here in Utah at the State Extension Service center. Linda