How To Use A Fagor Pressure Cooker
This post may contain affiliate links. We may earn a commission if you purchase via our links. See the disclosure page for more info.

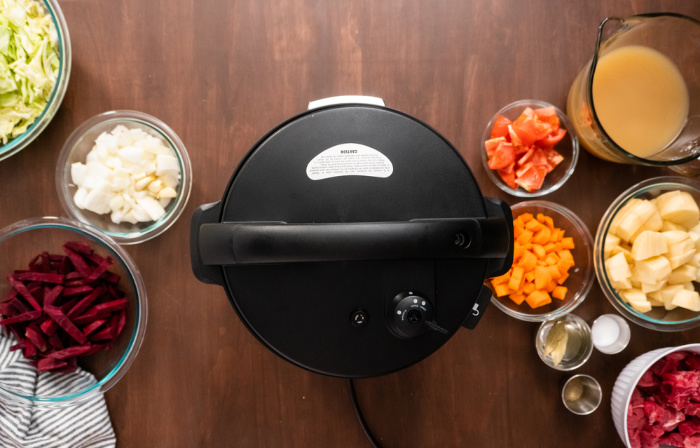
I’ve been getting a lot of emails asking about how to use quick and easy pressure cookers. I hope my pressure cooker pictures help you today. I’m a visual person, so pictures help me grasp things a little easier. I have canned green beans, tomatoes, salsa, spaghetti sauce, etc. in a Pressure Canner. Today I want to give you instructions on how to use an everyday cooking Pressure Cooker. We have all heard the horror stories that our grandma, aunt, mom, cousin, or someone else we know had an explosion, with food everywhere in the kitchen using a pressure cooker. Okay, here’s the deal, pressure cookers need not be feared. Of course, we need to be cautious and make sure we secure the lid with a good gasket. I wouldn’t leave it and go run errands, but it is quite simple and safe to use if you follow directions. Here’s a friendly reminder from a reader below, Debbie: They are NOT for canning.
How To Use A Fagor Pressure Cooker
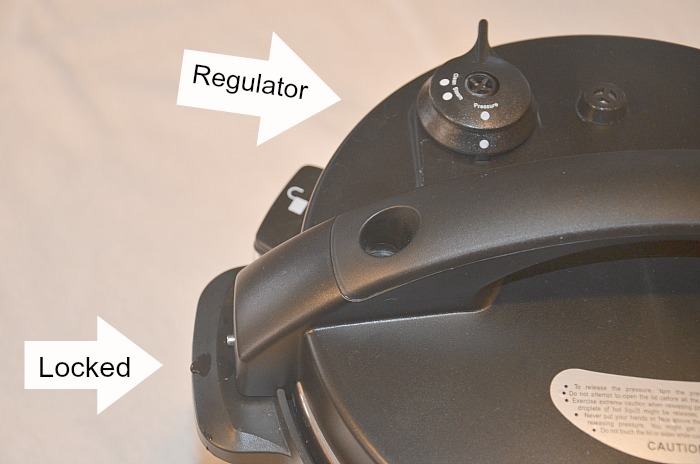
Every pressure cooker has a rubber gasket inside the lid. The gasket creates an airtight seal necessary for pressure cooking. This is one of the parts we need to make sure is still pliable, or replace if it is damaged in any way. You can see below where I labeled the Regulator Knob. This critical knob is the one we turn on the top of the lid to seal (for pressurized cooking), or vent (to release the pressure or to cook without pressure) the food we are cooking. This means you can use this “pressure cooker” for cooking foods in different ways. You don’t have to only pressure cook with this cooker. The filter protects the pressure regulator and is removable for cleaning. I always hand wash the lid to make sure any residue is completely removed after each use.
Here is a pressure cooker reminder to us that we must use a minimum of 1 cup of liquid when we pressure cook any food. This pressure cooker has a removable pot that is really easy to wash (it has a non-stick finish). I also purchased the optional stainless steel pot. Fagor 6Qt. Stainless Steel Removable Cooking Pot![]() You can actually do the following with this pressure cooker:
You can actually do the following with this pressure cooker:
1. Warm: reheats the food or keeps it warm until serving time.
2. Brown: you can brown your meat before you pressure cook it.
3. Steam: quickly boils water to steam veggies or rice.
4. Slow Cook: cooks recipes slowly (9-1/2 hour timer) – this means it can be a slow cooker.
5. Delay Time: allows you to delay the cooking up to 8 hours – I wouldn’t want to leave it for more than maybe an hour just to be safe (perishable).
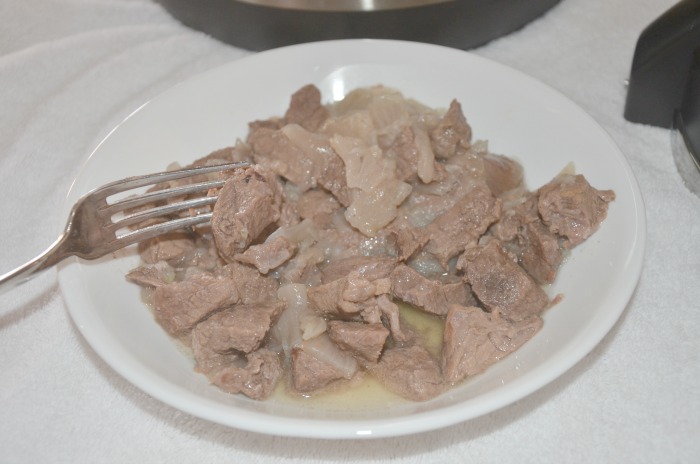
I picked up some stew meat this week that’s typically pretty tough, but it was on clearance and I knew I could tenderize it in my pressure cooker. If you want, you can add some barbecue sauce, but you will still need one cup of water. But before I show you how to lock the lid I want to show you how to “brown” any meat, whether chunks or full roasts, etc. If you brown your meat in a little oil it seals in some really awesome flavor. Plus, you can make gravy with the liquid after you cook the meat.
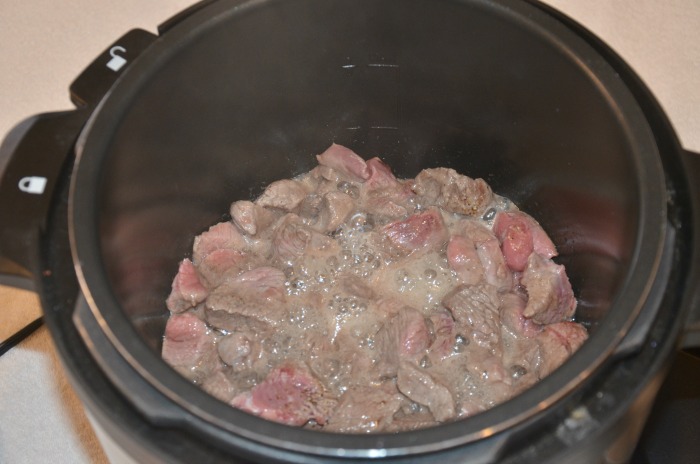
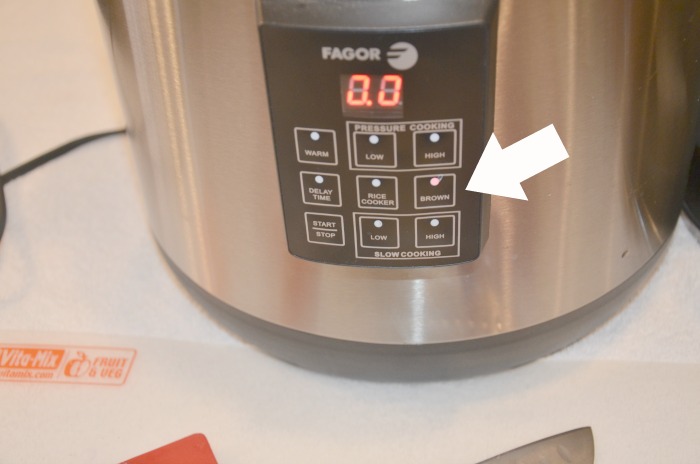
Can you see the “BROWN” button below? All you do is push that button and then the “START” button. You will soon hear the oil spattering a little and you should continue searing the meat to brown it to your liking.
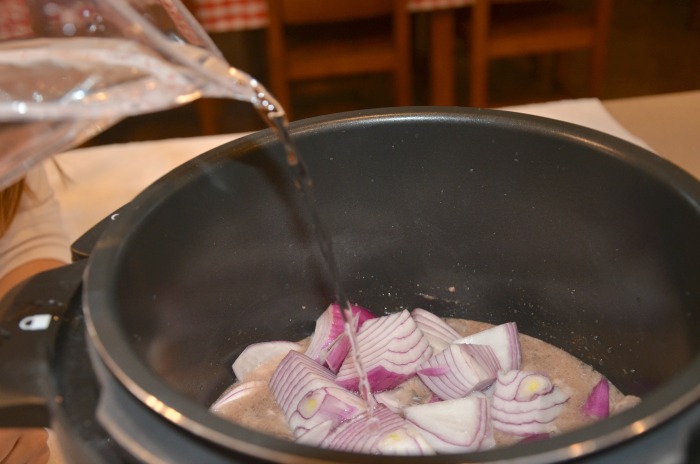
I added some chopped onions, I love onions in everything. This is where you will add one cup of water, broth, or other liquid before putting the lid on to pressure cook the contents.
Next, you put on the lid and turn it counter-clockwise until it locks into position. Turn the regulator knob to “SEAL” or “PRESSURE,” depending on your pressure cooker regulator model as shown at the top of this post.
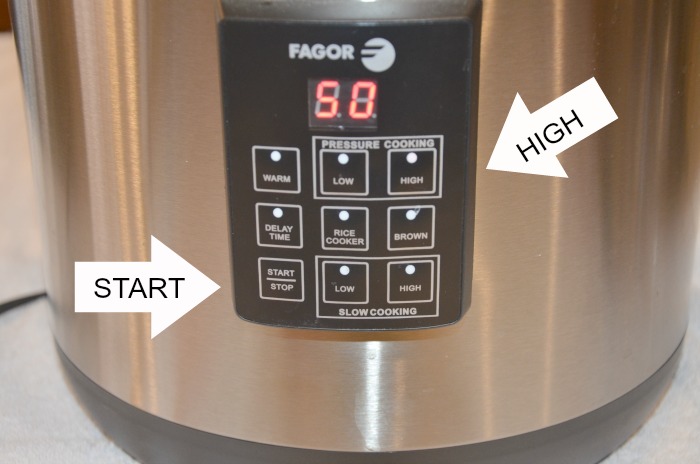
Next, choose either the HIGH or LOW-pressure button on the control panel. Check your pressure cooker for suggested settings. I set my beef chunks at 50 minutes on HIGH. Next, you push the indicator light to set the required minutes, in my case 50 times for 50 minutes. Next, press the START/STOP button to begin cooking. The indicator light will stop flashing. The cooker will count down after the pressure is reached. The floating valve will rise once the appropriate pressure has been reached, safely making it so the lid can’t be removed. The pressure cooker has two different ways to release pressure once the cooking is done. TIP: please be patient, because at first, you may think this darn thing isn’t even working. If the lid is locked it will work and you will soon see the numbers start going down, 50, 49, 48, etc. Remember, it takes a little time for the pressure to build up.
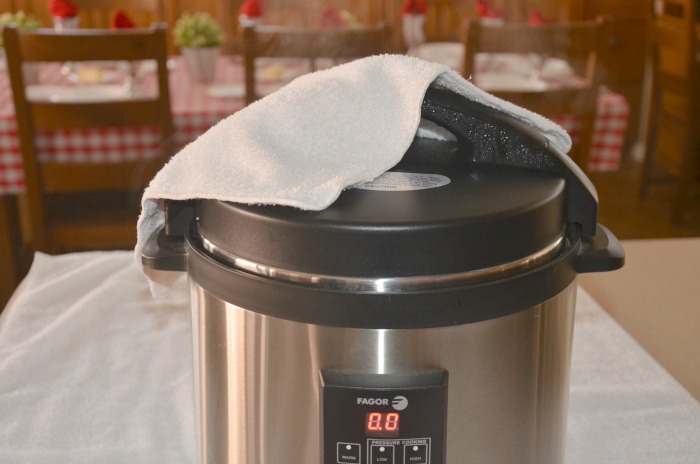
Here are two ways to release the pressure, be sure and use a hot pad or washcloth or you will get burned from the steam:
1. Natural Method-after cooking you will press the START/STOP button to stop the cooking process. Unplug the unit and wait for the pressure to naturally release….approximately 20-30 minutes. After this time move the pressure regulator to the vent setting to make sure all the pressure has been released.
2. Quick Release Method: after cooking press the START/STOP button to make sure the unit is completely turned off. Turn the pressure regulator to vent and allow the pressure to release. Caution! Keep hands and face away from the escaping steam as it is extremely hot and can cause injury. I use a washcloth to cover the release vent when turning it to help it from getting burned by the very hot steam.
I highly recommend one of these pressure cookers, or another similar brand, because of the saved time in preparing meals and saving money on utility bills.
Here is the finished product, so tender and moist, it’s unbelievable:
Printables for Easy Pressure Cookers:
You will need to adjust the times as needed to go with YOUR pressure cooker brand and model.
Pressure Cooker Temperatures-Meat
Pressure Cooker Temperatures-Vegetables
Pressure Cooker Temperatures-Rice, grains, beans
My step-by-step instructions for you:
Be sure and check your manual, but these are some pretty basic instructions for most pressure cookers:
Step #1 In this pressure cooker whatever you make MUST have a minimum of one cup of liquid to build up the steam every time you use it. My Fagor requires one cup of liquid. I never could find the requirement for liquids in the Instant Pot manual. Be sure and check your pressure cooker manual for the minimum liquid required.
Step #2 Place the lid on after you have placed the food you want to cook inside the pot (with one cup of water minimum) and turn it until it clicks into place. It will lock when you turn the pressure regulator button to “pressure” on the top.
Step #3 Touch the HIGH or LOW button, I typically always use the HIGH button. Check out my printable charts above to help you choose the time required to pressure cook the food item you are cooking. If your food is frozen it will take longer, about twice as long. The cooking times in my charts are for unfrozen food. It’s so easy you will cook every meal in one of these babies! You just keep clicking the high button until it shows 6 minutes for rice. Make sure the button on top is set on pressure or seal depending on what kind of pressure cooker you are using. Then you push the start button and let it do its thing. Dinner is ready in no time.
My favorite things:
- Fagor 670040230 Stainless-Steel 3-in-1 6-Quart Multi-Cooker

- Fagor 6Qt. Stainless Steel Removable Cooking Pot
- Instant Pot IP-LUX60 V3 Programmable Electric Pressure Cooker, 6Qt, 1000W (updated model)


I have 3 pressure canners for doing meat and for when the garden is harvested, one pressure cooker, but I don’t use it much. It does make rice pudding really quickly. I’ll have to drag it out and experiment with it. I don’t have an electric one, but I see it would be great for convenience.
Hi Janet, I have one All American Pressure Canner, and two pressure cookers. I will have to try my rice pudding recipe in the pressure cooker. Great tip, Linda
What great timing, my friend! I got a giggle when I saw the name of your new post. I have both my Midea 5 liter and Cosori 6 liter going at this minute. I’m making tortilla soup for co-workers and some like spicy, some don’t, so I’m making two batches. I use both all of the time and love them. I even got my older brother an Instant Pot for Christmas (I’ve heard they have better instructions than most) and a separate cookbook. I thought he would use it, but never expected the reaction I got. He was thrilled and said he opened the package when it arrived, rather than waiting for Christmas, and he had used it every day in the 10 days since he opened it and emailed to thank me. *G* Have a great day, Linda! Big hugs, Mare
Mare, I bet your co-workers love it when you bring them meals at work! Who wouldn’t love some of your tortilla soup! Hugs, Linda
I applaud the instructions for using a pressure cooker for everyday cooking as I love my 6 quart cooker as well and it’s great in emergency situations as I find my stove top cooker is fast and uses a minimum of fuel. One caution for those new to using pressure cookers. They are NOT for canning. The only thing pressure cookers and pressure canners have in common is that they use pressure to accomplish their tasks.
I know, that fun chef on tv shows someone using the cooker to can but this is very unsafe. I especially cringe when the jar of tomato sauce is placed on it’s side to can. If you know and understand the principles of canning, you will know that the air in the jar is forced out under the lid. The National Center for Home Food Preservation (THE bible for food preservers and a great website to bookmark) states that a pressure cooker must be able to hold a minimum of 4 quart jars in the upright position to pressure can safely. Also, processing times for electric pressure cookers have not been established. Tested and approved pressure canning recipes have processing times that include the time it takes to bring the canner to pressure as well as the cool down time to kill botulism spores – which cannot be seen, smelled or tasted but will make folks very sick.
Please enjoy your pressure cooker for everyday cooking but don’t use it for canning. The science of pressure canning must be respected. When you learn to pressure can properly, you’ll love preserving food in that manner as well. Safety first for all Linda’s loyal readers.
Hi Debbie, this is a great comment. I have my Master Preserver Canning Certificate and have been pressure canning for over 50 years. I really need to remind people of this. Thank you for your comment. I just had a dinner at my house and one lady mentioned she cans in her pressure cooker. OH NO! I gave her the link to the USDA canning and preserving website and told her to throw out any of the food she has “canned” in her pressure cooker. Thanks again, Linda
I recently bought an Instant Pot, and I LOVE that thing! We eat a lot of beans, and they now cook in 30 minutes instead of 4-6 hours. It even makes yogurt!
Hi Roxanne, oh how I love hearing this! I wish every family could afford a pressure cooker. I need to try making yogurt for my husband in mine! Hugs, Linda
I have an old fashioned stove-top pressure cooker. Any recipes for that?
Hi De, I don’t have any recipes for the stovetop pressure cookers, but I know Chef Brad uses both stovetop and electric. I would check out chefbrad.com