How To Plant Vegetables On Your Deck
This post may contain affiliate links. We may earn a commission if you purchase via our links. See the disclosure page for more info.

Today I want to talk about how to plant vegetables on your deck or patio. Mark and I have always enjoyed having a garden. We’ve learned over the years to grow lots of different things, and have tried to grow vegetables that we enjoy eating with our home-prepared meals. Life is good.
I’ve always wished we had more acreage so we could truly grow most all our fruit and vegetables. We’re at an age now that taking on more yardwork isn’t realistic, so making do with the small yard and raised grow boxes is how we roll.
I’ve grown to realize that many of my faithful readers have even less space to grow things than I do. I try to pass on ideas to these people so they can feel the joy of growing food sources with limited space. So, today we’ll discuss how to plant vegetables on your deck. Let’s get started with this fun post.
The Earthbox Gardening System for Planting Vegetables
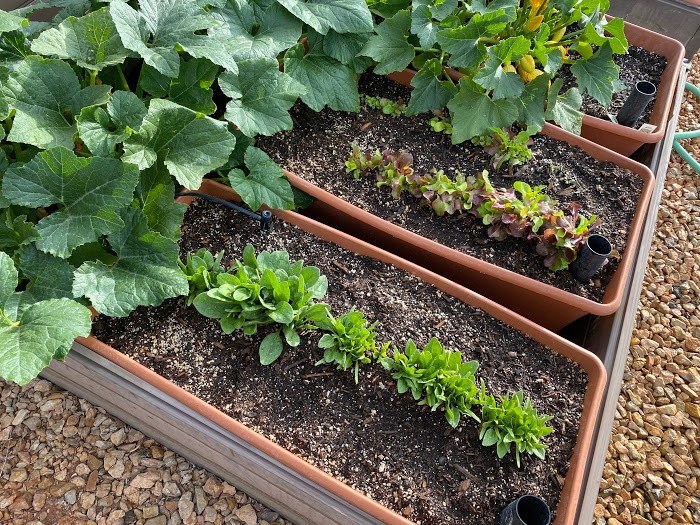
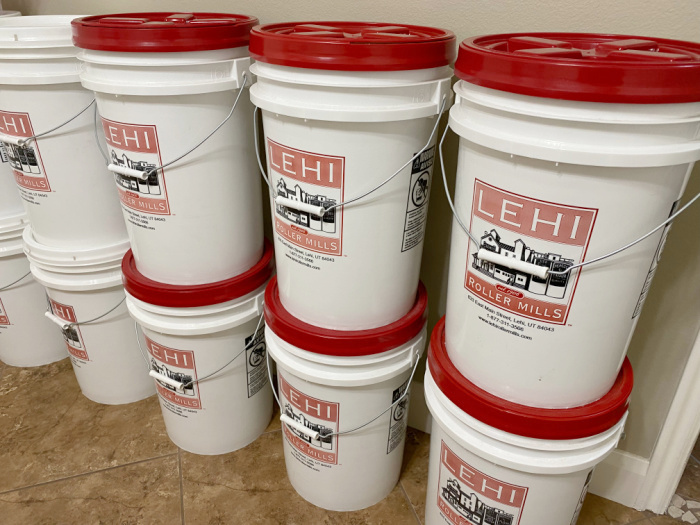
I recently became aware of a great company, Earthbox, which has an efficient gardening system you can put in place on your deck, patio, or small side yard. I’m running out of room to put more of my garden grow boxes, so I decided to buy nine of the terracotta-colored gardening system boxes that we’ll highlight today. Here are the ones I purchased: Earthbox Set
It’s easy to make these usable for almost any location. I’ll give you the step by step approach below to make them work for you and your family.
Step One
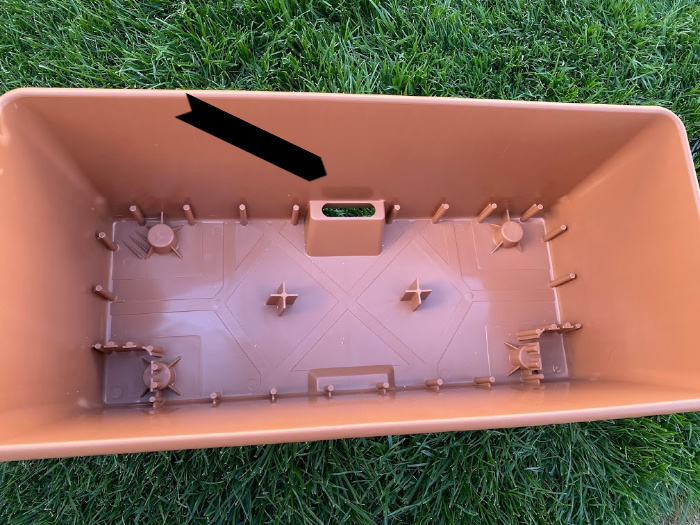
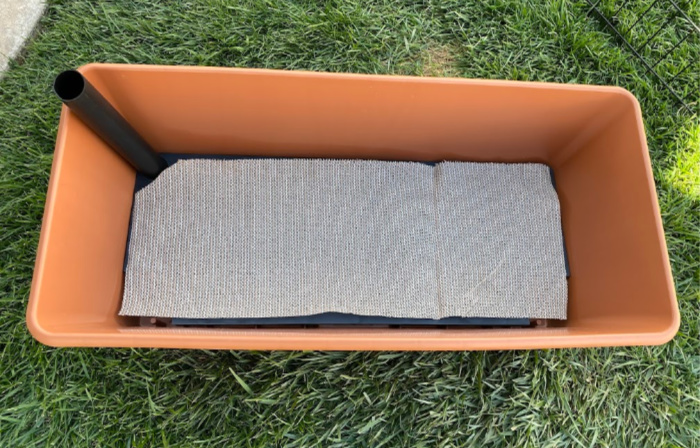
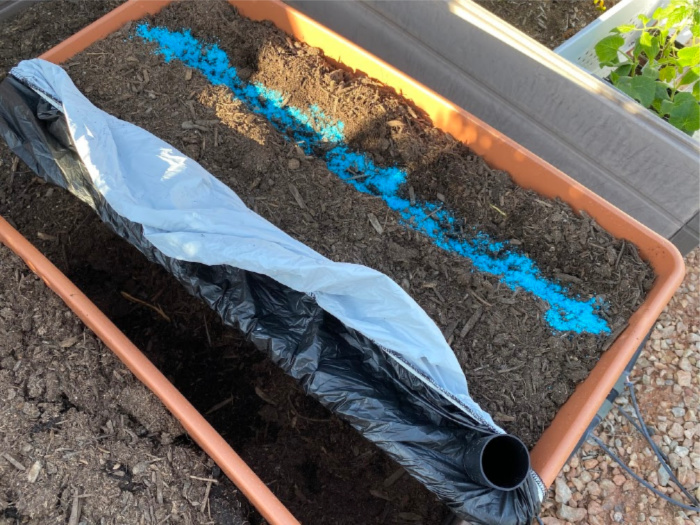
The picture below shows the inside of an empty gardening system box. I wanted you to see the slot that acts as an “overflow” so you don’t put too much water in the box. If you put too much water your plants could experience root rot which can be a real problem.
Step Two
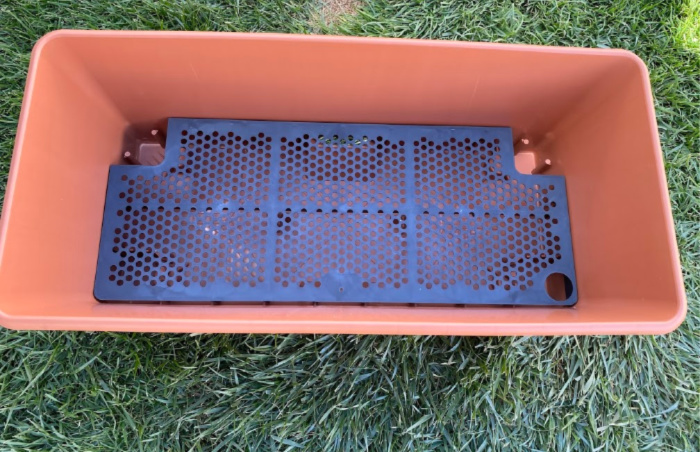
This step entails putting in the grey screen which holds the potting soil that Earthbox calls “growing media.” This screen keeps the soil and plant roots above the water level. Note the two upper corners of the screen. Earthbox suggests you pack these corners with the soil as you fill the box.
Step Three
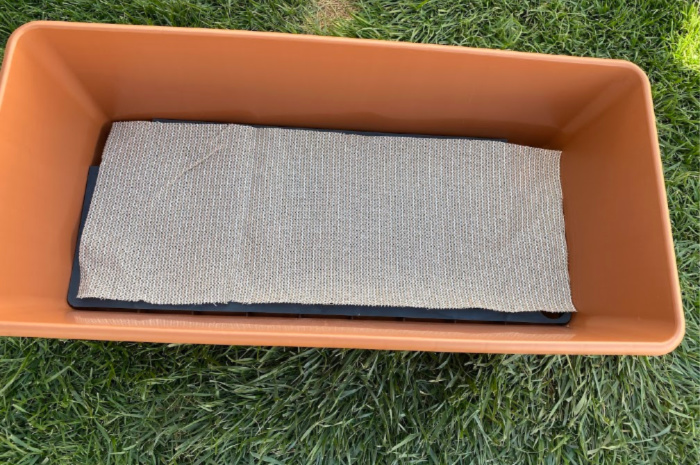
My neighbor has several of these Earthboxes and showed me how he put theirs together. When he first purchased them, the soil kept “washing away” so he put down a single layer of garden sunscreen fabric before adding the soil. I bought this fabric to lower the effects of the high temperatures in Southern Utah on some of my grow boxes, but it works well for this as well.
This fabric draped over my tomato plants or other vegetables lowers the temperature by 15 degrees. That may not sound like much, but when the temps get over 110 degrees in the summer, this fabric rocks! Easy Gardener Sun Screen Fabric
Step Four
In the top left corner is the fill tube that fits snuggly in a circle already cut in the screen. Make sure you push the tube down as far as possible so it won’t come loose. The black fill tube is how you fill the bottom of the box with water. You’ll want to add water every few days when the plants are young, and at least once every day as the plants reach maturity.
Step Five
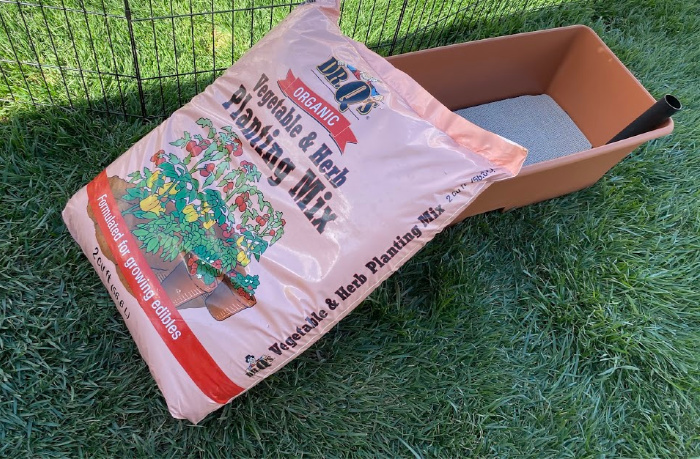
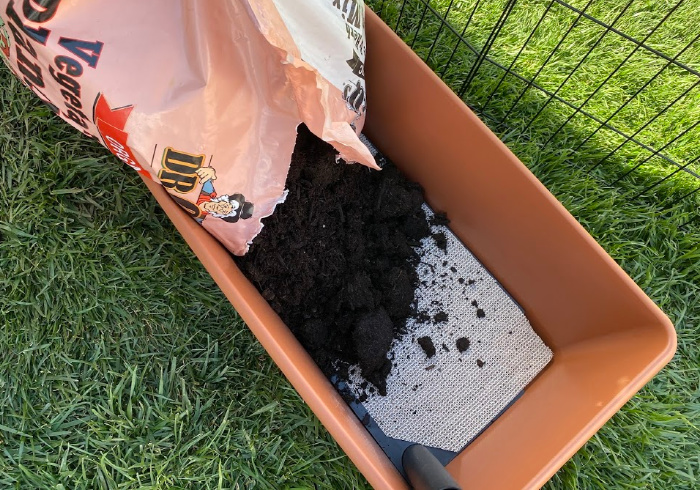
Now you’ll add the potting soil – planting mix. I really like Dr. Q’s Organic Vegetable & Herb Planting Mix. We’ve used this mix the past two growing seasons and have loved the results.
Step Six
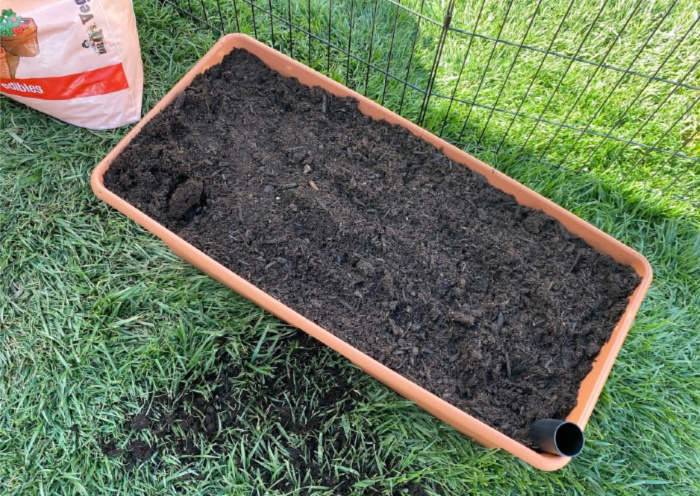
Spread the mix evenly throughout the box so it’s ready to receive the seeds or young transplants. We used about 2/3 of the 2 cubic foot bags for each box.
Step Seven
Now the box is full of potting soil it is ready for a treatment of your favorite fertilizer and the plants you’ve decided to plant. The instruction book included with your system provides some guidance regarding how many seedlings they suggest based on the type of vegetable. For example, you would put fewer tomato plants than you would carrots.
Step Eight
Proper placement of the gardening system boxes is critical. You’ll want them in a place where there is direct sunlight available, where you have access to the water hose, and where you can get around them to monitor weeds and do any thinning needed.
I placed three Earthboxes in one of my four foot by four foot by 18 inches deep raised garden beds. It’s getting harder to bend over to work in the garden now. The instructions show where to place the seedlings and where to put your fertilizer.
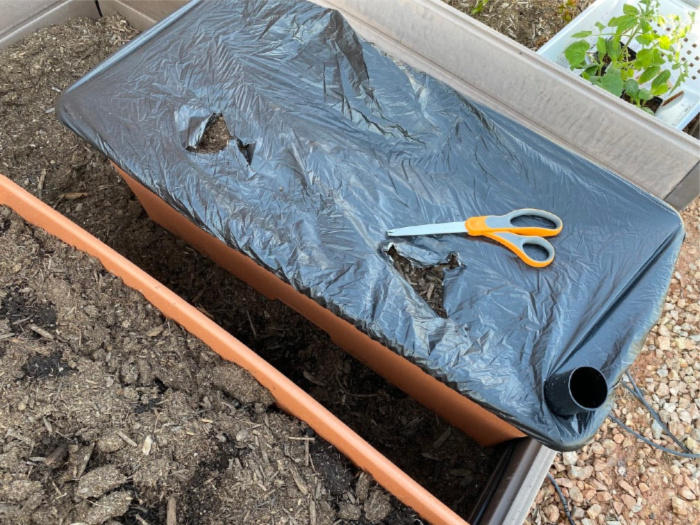
Make a trough to place your granulated fertilizer. Then cover the fertilizer with soil before putting the cover on. This first box will have two bush cucumber plants. I used this fertilizer: Miracle Grow Plant Food
Step Nine
This cover may look gray but it’s black. According to the instructions included, it states to place the black side up. If the peak growing temperature consistently remains above 85 degrees F, place cover white side up.

Step Ten
The instructions said to cut an X in the cover at the location you plan to place your transplant. Well, it was harder than it looks. I have a camera in one hand and scissors in the other hand. So, it’s a hole, let’s leave it at that.
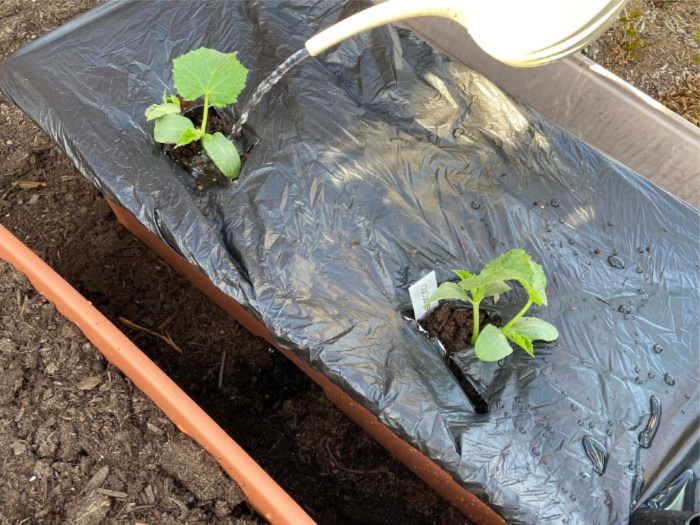
Step Eleven
Now you plant your seedlings, in my case my two bush cucumbers, one in each hole. Then water them like any new seedling near the base of the plant. I will water them through the black tube going forward.
This Earthbox will only have these two plants. I will add more pictures as I plant more. I ordered six more boxes. I’m totally stoked to use these this year.
Step Twelve
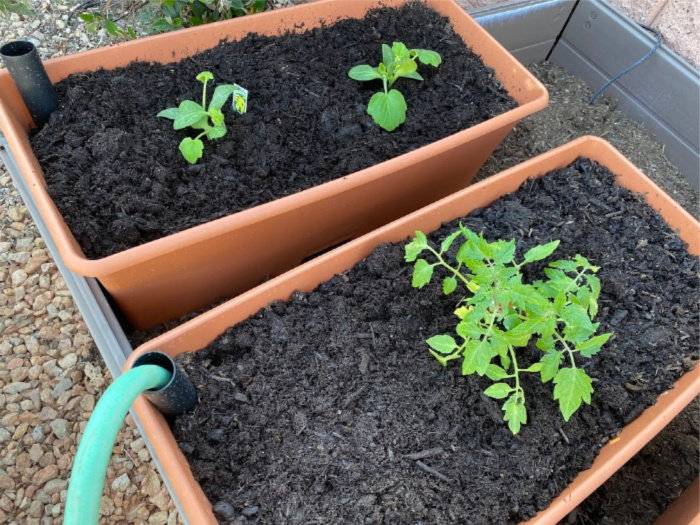
I decided to plant some plants without the covers, right or wrong that’s what I decided to do. On my Food Storage Moms Facebook page a reader shared several pictures without the covers using several Earthbox units. So, this what I’m doing.
Here’s the deal, I still want the covers, IF I plant seeds and want to keep the young plants from freezing. It’s all good, just a different way to roll, or grow vegetables, in my case.
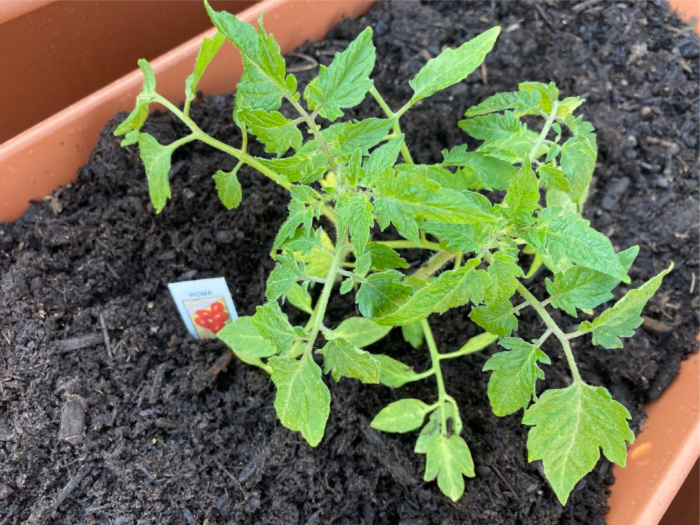
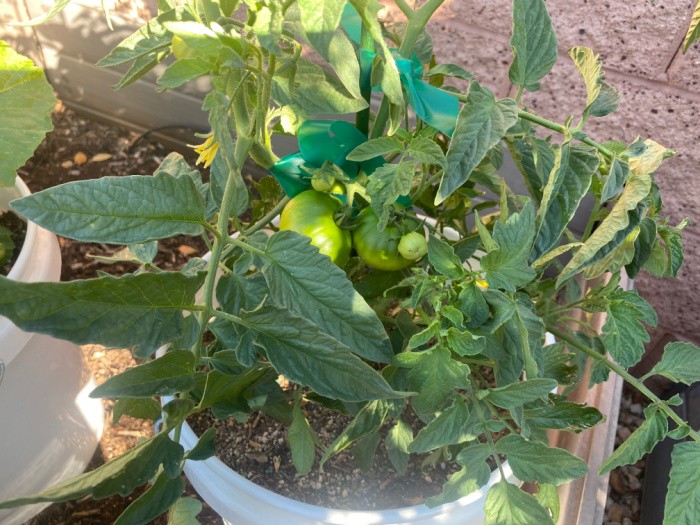
Crookneck Squash is in the top box and Roma tomatoes are in the bottom box. If you are wondering if I will water them through the black tube, yes I will be watering them with a hose into the tubes.
I will also be using tomato cages on my Roma tomatoes and the squash.
Please Check Out What To Plant Each Month:
- What To Plant In January
- What To Plant In February
- What To Plant In March
- What To Plant In April
- What To Plant In May
- What To Plant In June
- What To Plant In July
- What To Plant In August
- What To Plant In September
- What To Plant In October
Garden Gloves
These are my favorite garden gloves: DIGZ Garden Gloves They come in different sizes, that’s what I love the most. These are the best rose bush gloves: DIGZ Rose Bush Garden Gloves I have to get the large size for my hands. These are awesome!
Final Word
I hope you liked my post today on how to plant vegetables in these Earthboxes. I’m always on the lookout for new ways to expand my vegetable gardens. I wish I had 5 acres, but I don’t.
But, I will tell you this, I produce enough veggies for 2 families to eat all summer. Don’t you love that first tomato? May God bless this world, Linda


I wish I could send you a picture of my little chard plants in their Earth Box! I love chard because it is very nutritious, delicious, and easy to grow. I’ve never had a pest problem with chard (unlike kale, which aphids love), and it is very tolerant of both heat and cold. Also, if you just harvest the leaves, it will resprout next spring.
Hi Roxanne!! WHAT, you have Earthboxes?? Oh my gosh, I love hearing this! Do you use the covers or do you just grow the food in the Earthboxes without the covers? Thank you, Linda
Linda, I have never used the cover– I’m a lazy gardener! Also, Leanne, mine is just the one from the big box store, I don’t think it’s the name brand. As long as I keep the water reservoir topped up and can keep my German Shepherd from stealing the water fill tube, it is trouble free.
Hi Roxanne, oh my gosh, I’m so happy to hear this! No cover! I was so frustrated about cutting the X, but I will keep them. The German Shepherd, I love it!!!! Linda
Thanks, Linda.
I am going to try out my grow boxes again this year and see if I have ANY success!! They are not Earth Boxes so that might be my problem!! Anyway, if I don’t have any success this year, I will ditch the 3 I have and get Earth Boxes instead. I just ordered the sunscreen. I will likely dump out my soil and add some to the bottom of the boxes I have when it comes in.
Wish me luck in growing a successful garden on my balcony!!
Hi Leanne, if it’s back-ordered please tell me, I can ship some to you. I’m going to be cutting more rectangles. Keep me posted, I would be happy to ship some to you. Just tell me the size and how many you need. Linda
Thanks for the offer, Linda. It was in stock so it is now ordered and will be here next week! Yay.
Hi Leanne, great news! Your boxes look almost identical to the Earthboxes. Hopefully, the soil you get is better? Fingers crossed. Linda
Hi there,
I have used the “other” brand of grow boxes with great success. I’ve grown cucumbers and tomatoes in these boxes and reaped good harvests of both plants. The grow boxes that I used came with sheets of fertilizer that you placed on top of the soil. Didn’t have any growing problems with them.
Just an FYI for all who want to consider this type of “planter”.
Hi Suzanne, thanks for letting us know! I’m super excited to use these in addition to my raised garden boxes. I love hearing this! Linda
I just use a plain old flower pot. I have some really big pots my mom had. I put 1 tomato plant per pot.
I usually put my cherry tomatoes in these pots. I have enough for 14 plants. So I figure I’m doing pretty good. I just put a little new soil in once a year and they grow and grow. Nothing fancy but they
work. I have a regular garden space I use for regular tomatoes and green beans maybe a few other things. This year I started my own sweet potato, I haven’t done in a few year so I thought why not
do it again.
Hi June, I have some flower pots too! I grow my potatoes in them. I love trying new things so I can grow more food. I was anxious to see if these would work for my readers who have a small patio, porch, or a deck. I planted sweet potatoes last year, they went crazy! I had so many I could have fed the entire street! LOL! They sure did taste good! Linda
Linda, we are starting to see the soil you like here in NW Florida at Lowe’s. I haven’t seen any of the exact formula you shared, but saw a small bag from that company for houseplants and several different liquid fertilizers and pest control formulas.
The seed starting class I took in February has been a great help. I did lose several seedlings to bad weather. Lost a few more to Bad Hannah, the over exuberant German Shepherd pup! She thought those little plastic containers made such an interesting crinkly noise when she grabbed them!
I am using the kiddie wading pool, livestock mineral tubs,feeding troughs and leaky water troughs that I have as containers. I have redone several for the tomatoes so far. I cleaned each after emptying out the old soil, disinfected with a mild bleach solution and rinsed. Then added a good 3″ layer of gravel for drainage, a layer 3-4″ thick of pine bark mulch to hold water, then filled the rest with the homemade soil mix we learned to make in the seed starting class…..
Homemade potting soil; equal parts coconut coir or peat moss, mushroom compost, pine bark mulch.
So far my recycled containers are growing lettuces, garlics, carrots, tomatoes, onions, a vining spinach, Galilee Spinach and zuchini. I’ll be filling the rest of my containers this weekend and transplanting the herbs, cukes and squashes into them. It’s already so warm here that I don’t like being outside after 11 am, so I am keeping the majority of containers close to the house.
I also added the homemade potting mix to my raised beds and doubled the amount of asparagus and potatoes I had in them. Kept 2 beds for sweet potatoes. And have 2 hugelculture type beds in the making for the fall.
I collect earthworm castings from our yard and add a bit in the hole I plant seedlings in. That has worked well and seems to make those little plants thrive. The earthworm castings also make a good tea to use throughout the growing season. I have also soaked elderberry cuttings in that tea and had them do well when I put them in a new spot in the yard.
God Bless you and your readers for sharing wisdom and encouragement with the world.
Hi BDN, oh my gosh, your formula is very similar to the bags I buy now! Isn’t it fun when we learn new tricks for gardening? Wow, you have been busy girl prepping your gardens!!! You know I LOVE hearing this! We had a little chill, not a freeze but I’m going to have to replace the cukes, dang. But, the tomatoes are doing well! Life is so good when we produce our own food. You truly inspire me! Stay well, Linda
The gardeners that taught the seed starting class told us about a place called Greenhouse Megastore. It was online and very easy to navigate and order from.
I ordered 3 clear tall (7-8″ high) domes that fit those long seed starting trays. Have used the domes to protect the trays of seedlings from cold temps or heavy rains. Have also covered transplanted seedlings with them as needed.
The domes are tall enough that seedlings get a good start and are sturdy when I move them to their permanent home. Plus the domes are reusable for several seasons, have 2 adjustable vents, so it’s possible to control the heat, either by closing them when it was in the 30’s or opening them a bit when it got warmer at night. I take them off during the day now that we are in the 80’s and only put them back on if we’ve hard rain or cold overnight.
The domes are close to the size of your large Earthboxes. The domes were about $8 each, plus shipping/ taxes. They might be a good option for protecting plants. I will be ordering a few more for the fall planting season.
Hi BDN, oh my gosh, I need some of those domes. Mark and I went outside and I said I would really like some domes for the Earthboxes!! You must have read my mind!!! Thank you so much! I will order some today!! Thank you! Linda
I love the way you use the black plastic! I never thought of that and now I have a major weed problem. I am going to have to replace everything in my 6 planters. Thanks for the tip. I will definitely use that the next time I plant. Thank you! I live in WA and the weeds and grass come in from all over even though I try and keep them out. the plastic shouls really help.
Hi Cheryl, the weeds are a pain for sure. Once you get them under control it’s better but wow, they love to spread!! The grass is really hard to get rid of, good luck, I hope it works. Linda
Intersting! My instructions did not mention black on mine. Mine were just white. The first year went ok, but the weeds were horibble the next year. I am going to have to repot my 5 or next year if I am going to be abe to use them. Grass blows in from all over here and covering with black plastic will really help. I didn’t use them this year, but will try for next. Good info.
Hi Cheryl, weeds are the worst. The grass is so hard to get rid of, I hope you can find a way to keep the weeds down. Linda